


StruXure
Manufactured entirely in the U.S.A. using recycled aluminum and stainless steel components for a low maintenance, long-lasting product. StruXure system is engineered to withstand high winds and heavy snow loads. StruXure is ideal for any outdoor living area such as patios, decks, lanais, verandas, entry ways, courtyards, outdoor kitchens, swimming pools and spas. A variety of colors, materials and finishes are available to compliment any architectural style.

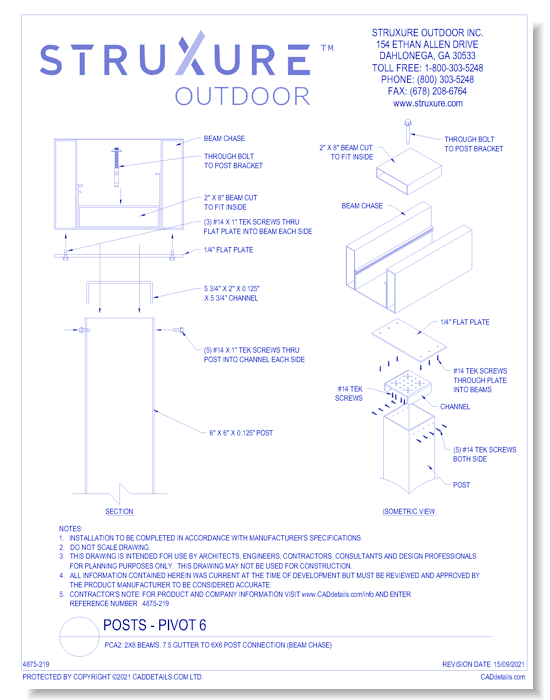

PCA2: 2 x 8 Beams, 7.5 Gutter To 6 x 6 Post Connection (Beam Chase)
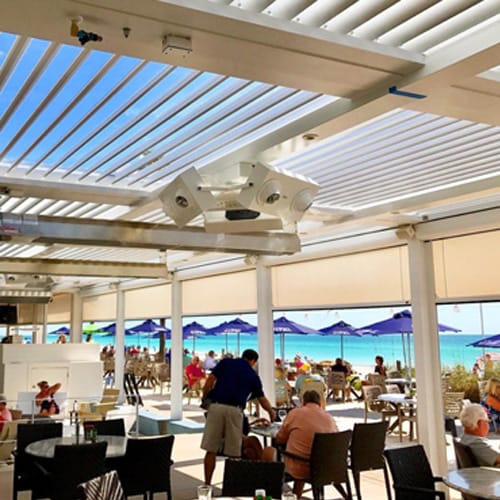
StruXure’s Pergola X is a motorized louvered system designed for both residential and commercial applications. Louvers pivot at the touch of a button to provide sun, shade, and airflow control, and, when closed, an integrated gutter system directs rainwater through concealed channels for effective drainage.
Each system is engineered to order and can be installed as a free-standing structure or attached to an existing building. A durable powder-coated finish provides lasting protection, and ICC certification ensures structural integrity and safety.
Ideal for patios, courtyards, pool decks, outdoor dining, and other gathering spaces, Pergola X provides adaptable coverage that integrates with a wide range of architectural styles and project requirements.
- About
- Education
- Select All
- Media
- CAD PDF
- CAD DWF
- CAD DWG
- CAD GIF
- CAD VWX
- CAD DXF
- Specs DOC
 PCA2: 2 x 8 Beams, 7.5 Gutter To 6 x 6 Post Connection (Beam Chase)
VIEWING
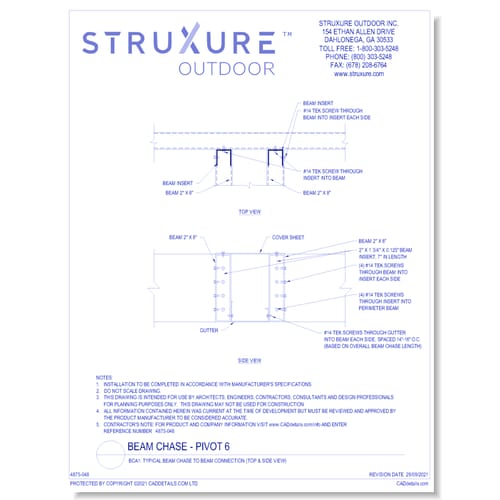 BCA1: Typical Beam Chase To Beam Connection (Top & Side View)
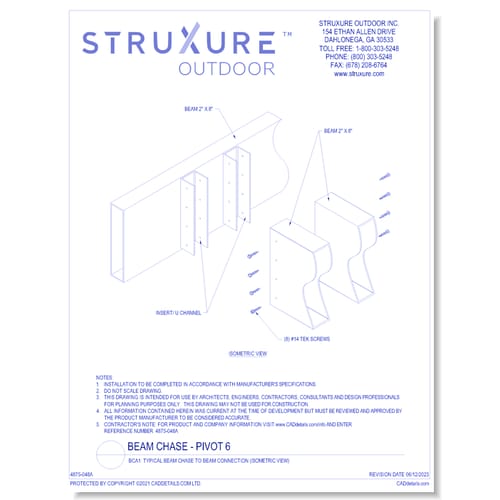 BCA1: Typical Beam Chase To Beam Connection (Isometric View)
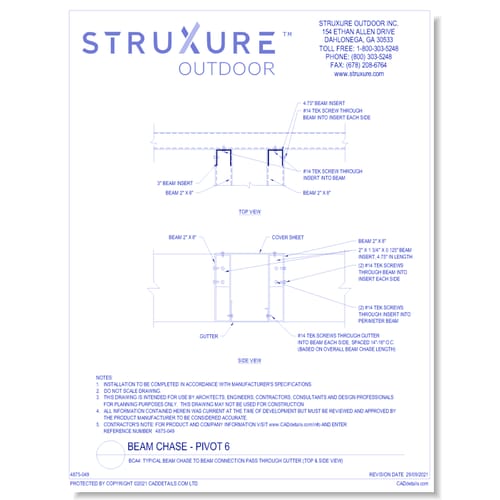 BCA4: Typical Beam Chase To Beam Connection Pass Through Gutter (Top & Side View)
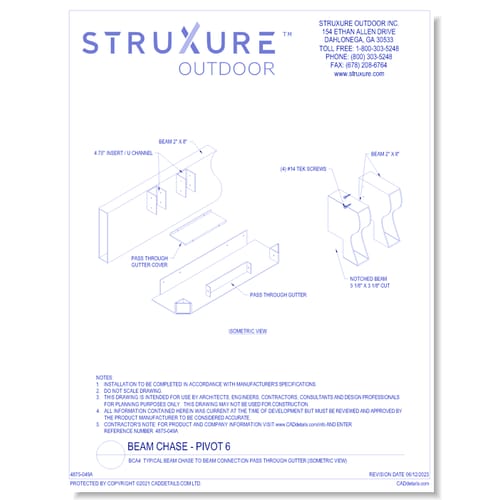 BCA4: Typical Beam Chase To Beam Connection Pass Through Gutter (Isometric View)
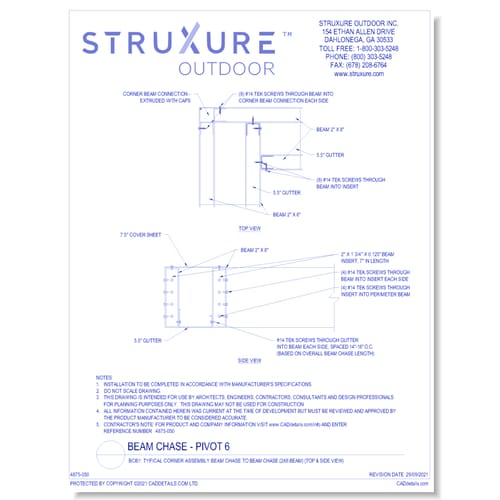 BCB1: Typical Corner Assembly Beam Chase To Beam Chase (2 x 8 BEAM) (Top & Side View)
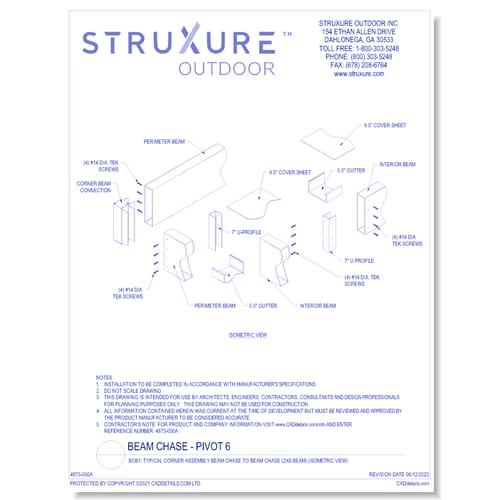 BCB1: Typical Corner Assembly Beam Chase To Beam Chase (2 x 8 BEAM) (Isometric View)
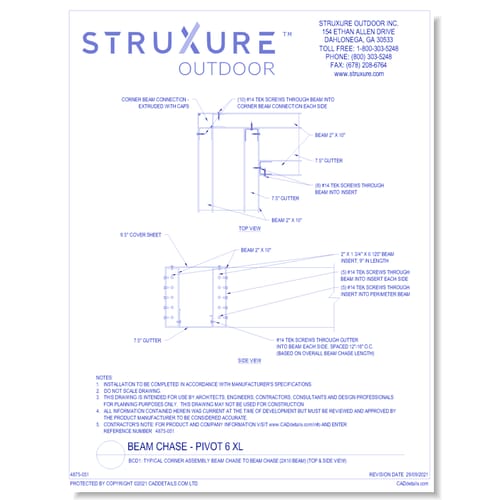 BCD1: Typical Corner Assembly Beam Chase To Beam Chase (2 x 10 BEAM) (Top & Side View)
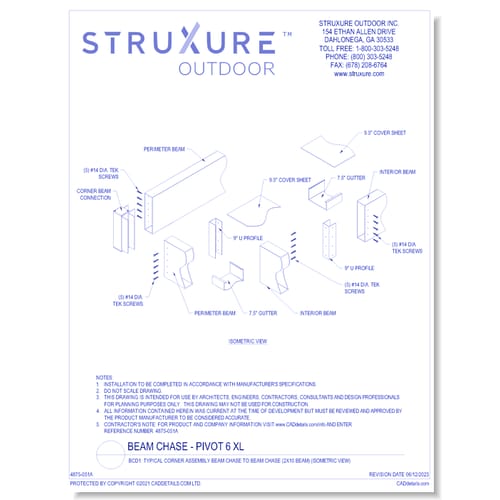 BCD1: Typical Corner Assembly Beam Chase To Beam Chase (2 x 10 BEAM) (Isometric View)
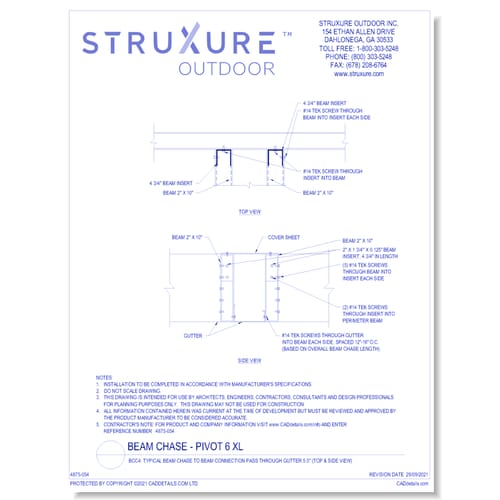 BCC4: Typical Beam Chase To Beam Connection Pass Through Gutter 5.5'' (Top & Side View)
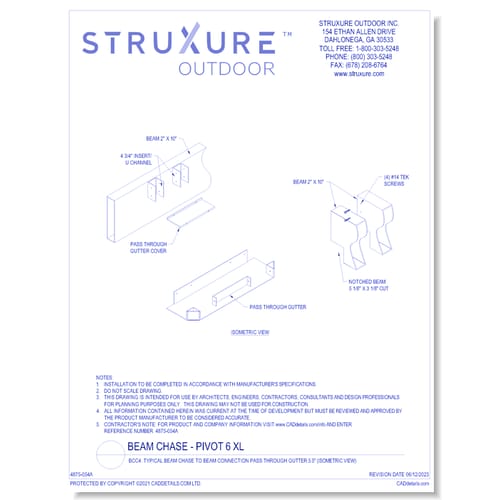 BCC4: Typical Beam Chase To Beam Connection Pass Through Gutter 5.5'' (Isometric View)
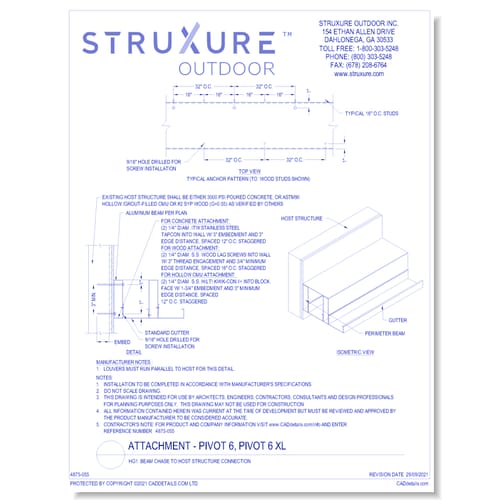 HG1: Beam Chase To Host Structure Connection
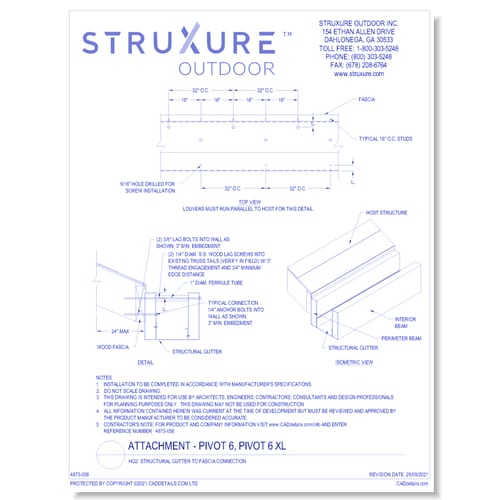 HG2: Structural Gutter To Fascia Connection
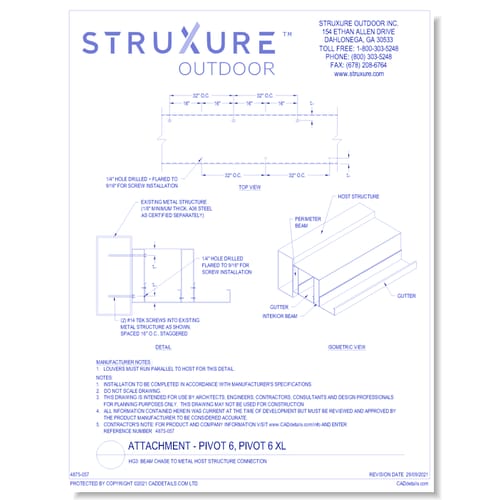 HG3: Beam Chase To Metal Host Structure Connection
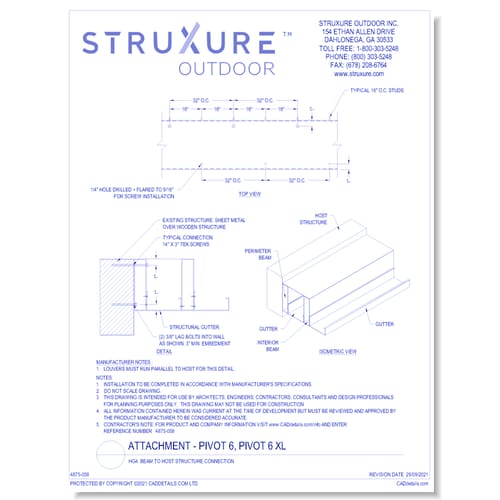 HG4: Beam To Host Structure Connection
 HG9: Beam To Host Structure Connection
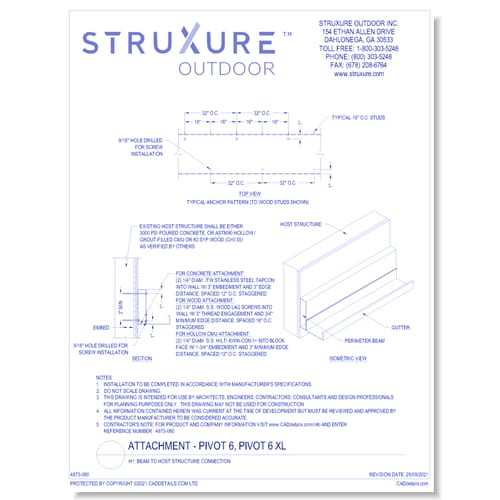 H1: Beam To Host Structure Connection
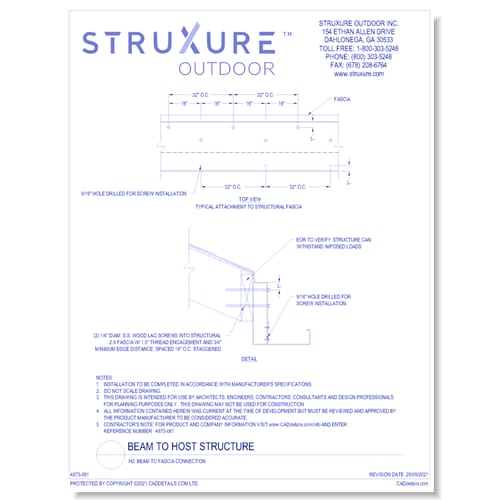 H2: Beam To Fascia Connection
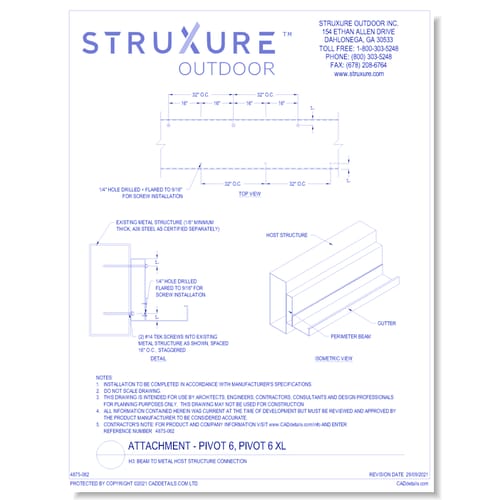 H3: Beam To Metal Host Structure Connection
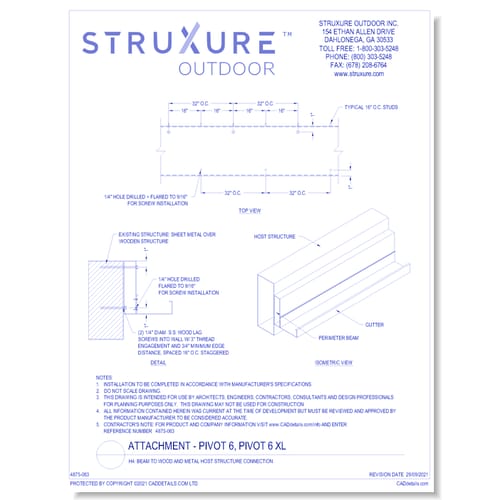 H4: Beam To Wood And Metal Host Structure Connection
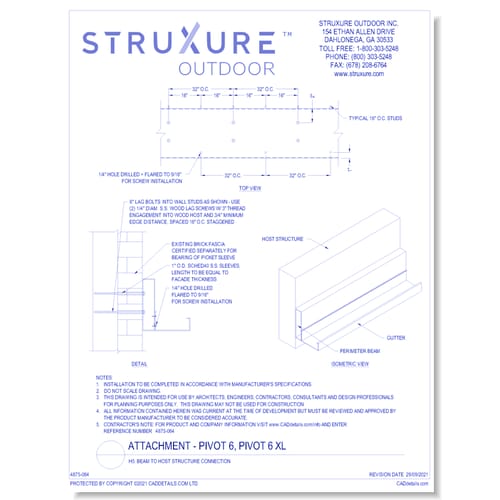 H5: Beam To Host Structure Connection
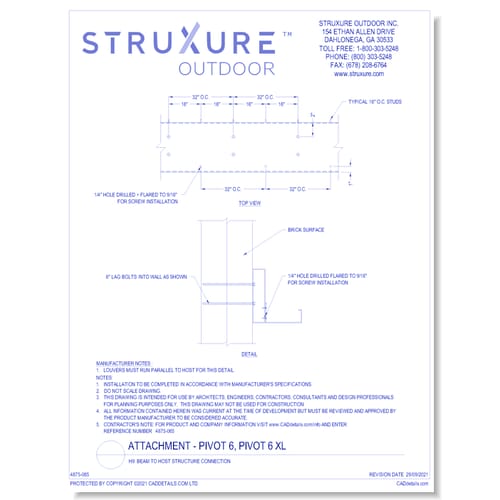 H9: Beam To Host Structure Connection
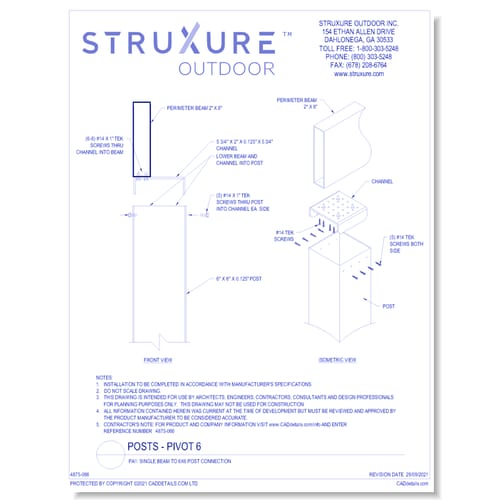 PA1: Single Beam To 6x6 Post Connection
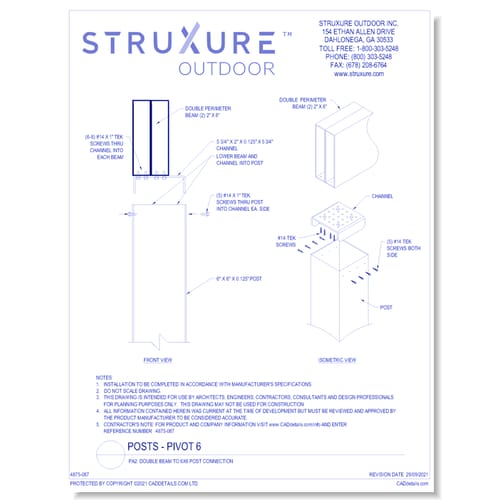 PA2: Double Beam To 6x6 Post Connection
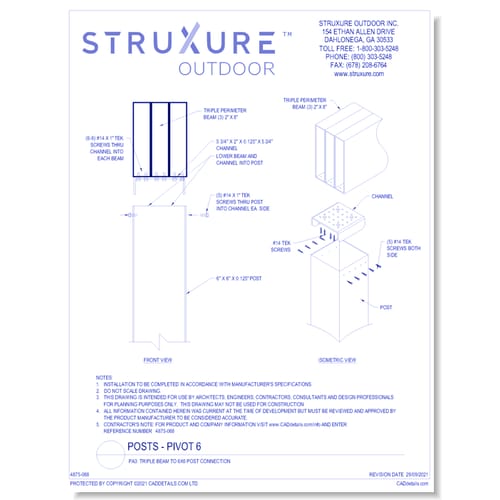 PA3: Triple Beam To 6x6 Post Connection
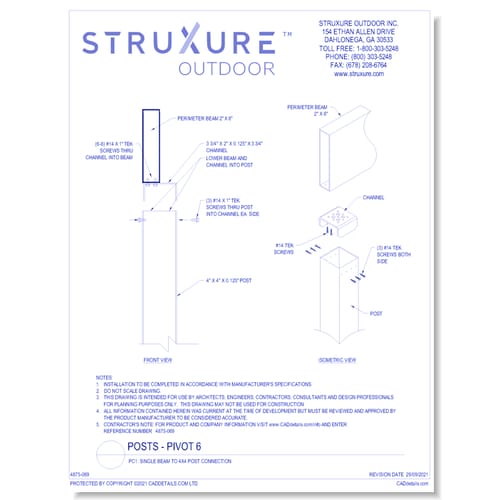 PC1: Single Beam To 4x4 Post Connection
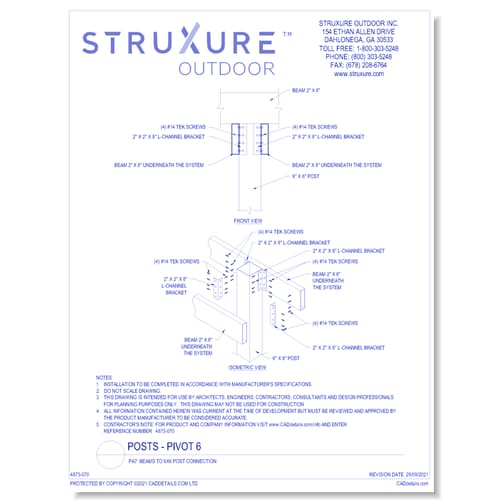 PA7: Beams To 6x6 Post Connection
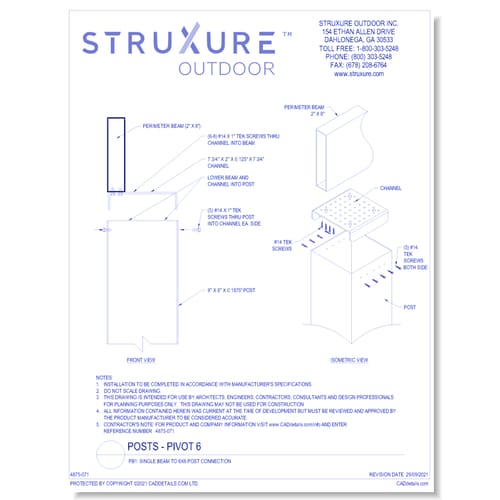 PB1: Single Beam To 8x8 Post Connection
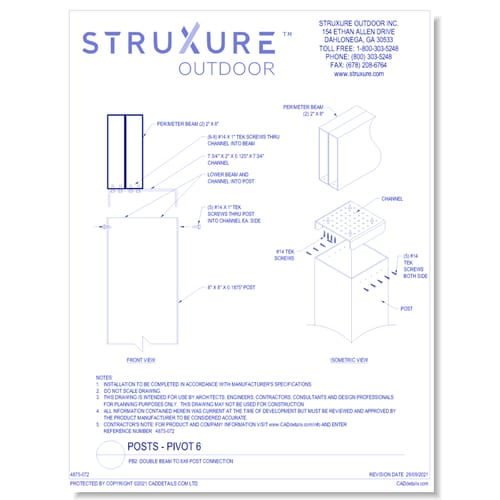 PB2: Double Beam To 8x8 Post Connection
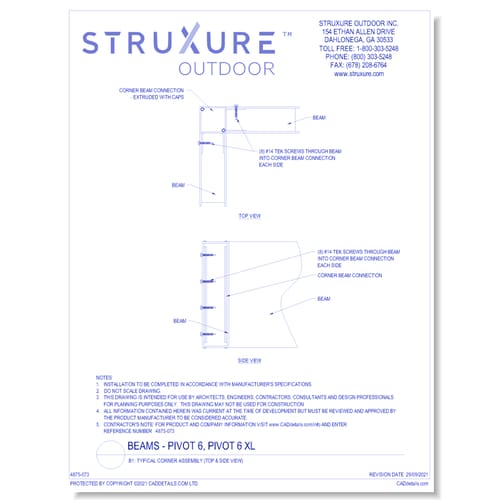 B1: Typical Corner Assembly (Top & Side View)
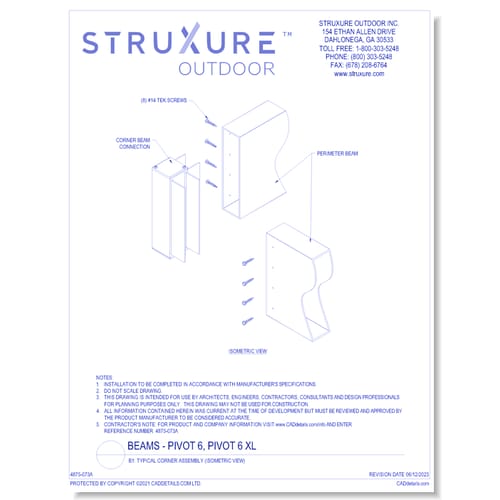 B1: Typical Corner Assembly (Isometric View)
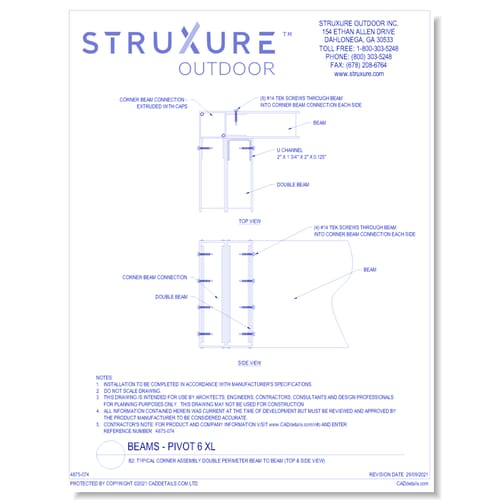 B2: Typical Corner Assembly Double Perimeter Beam To Beam (Top & Side View)
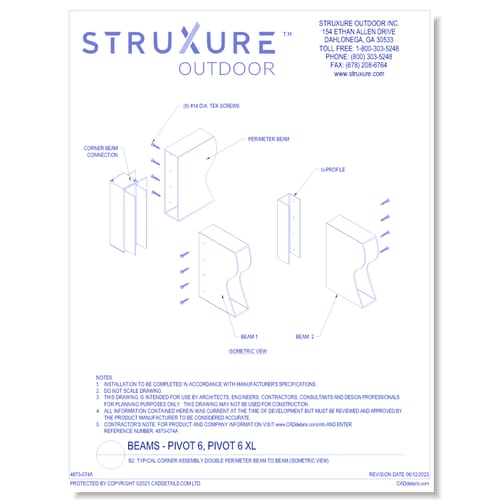 B2: Typical Corner Assembly Double Perimeter Beam To Beam (Isometric View)
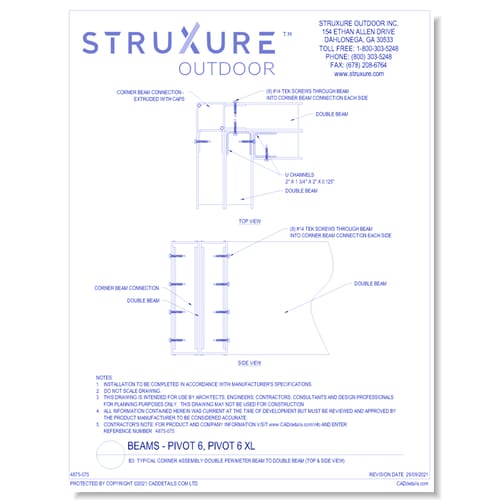 B3: Typical Corner Assembly Double Perimeter Beam To Double Beam (Top & Side View)
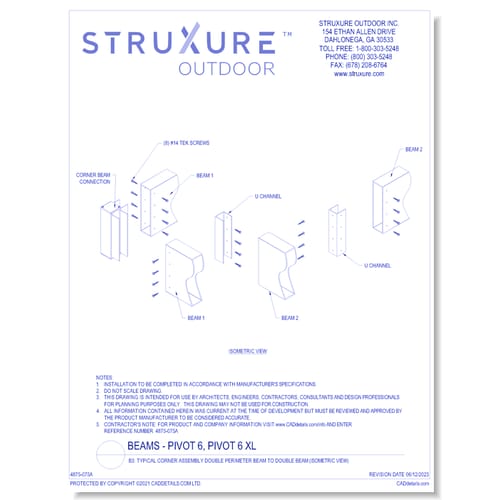 B3: Typical Corner Assembly Double Perimeter Beam To Double Beam (Isometric View)
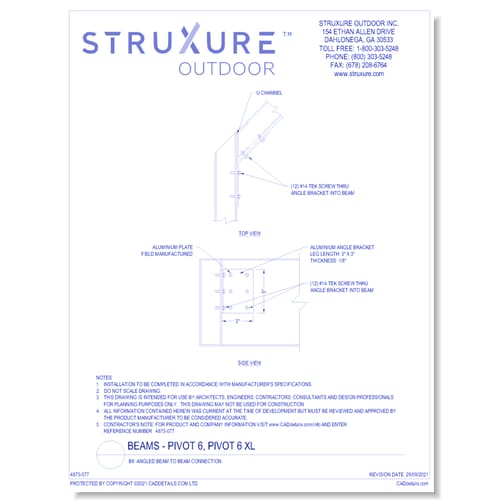 B8: Angled Beam To Beam Connection
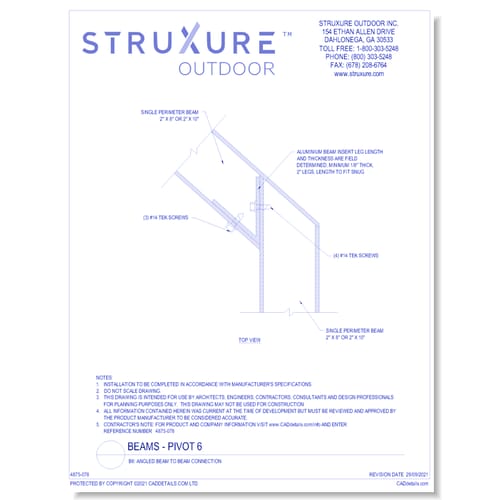 B6: Angled Beam To Beam Connection
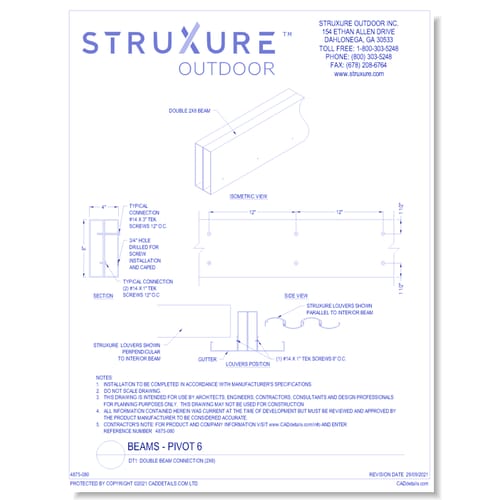 DT1: Double Beam Connection (2 x 8)
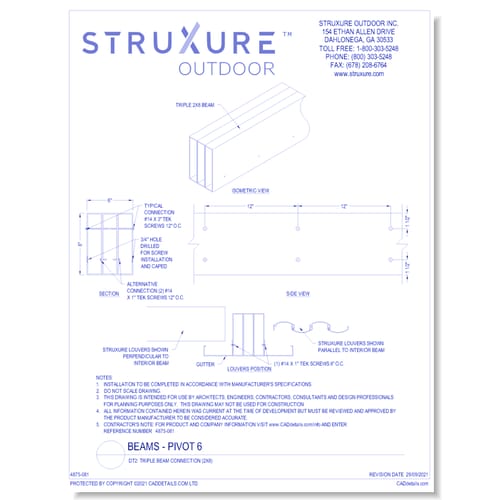 DT2: Triple Beam Connection (2 x 8)
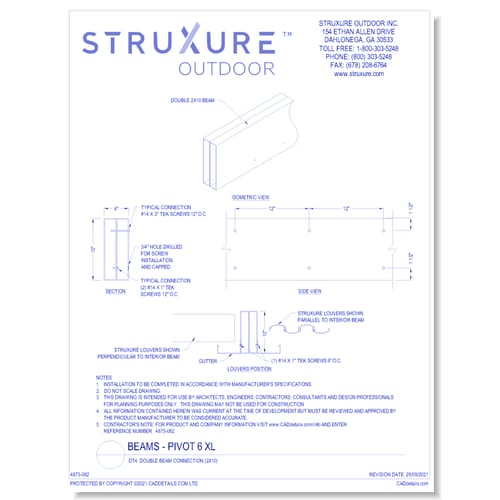 DT4: Double Beam Connection (2 x 10)
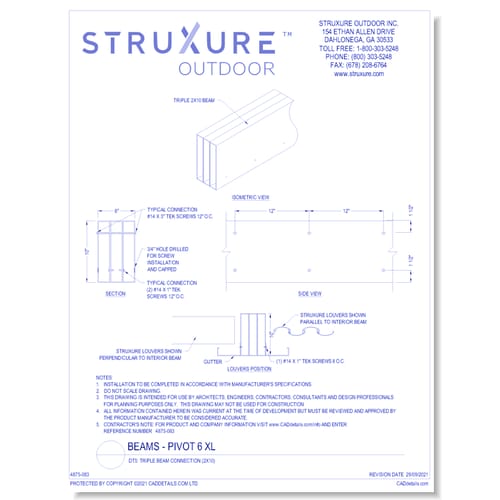 DT4: Triple Beam Connection (2 x 10)
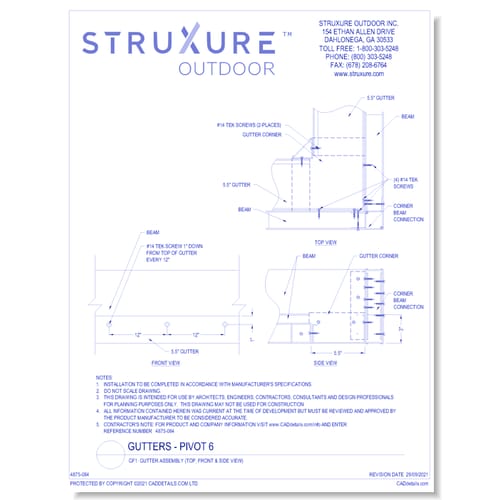 GF1: Gutter Assembly (Top, Front & Side View)
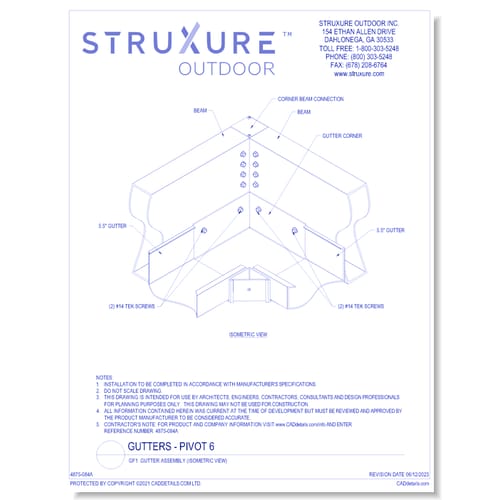 GF1: Gutter Assembly (Isometric View)
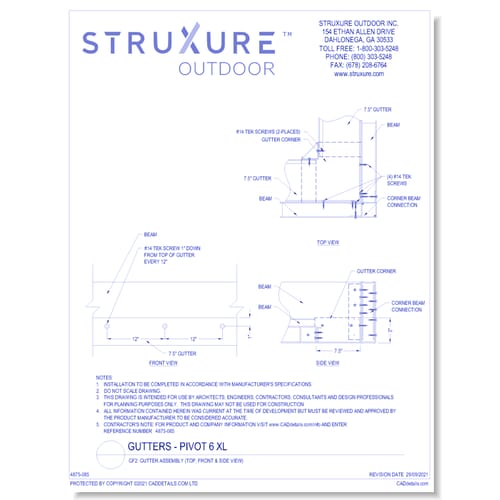 GF2: Gutter Assembly (Top, Front & Side View)
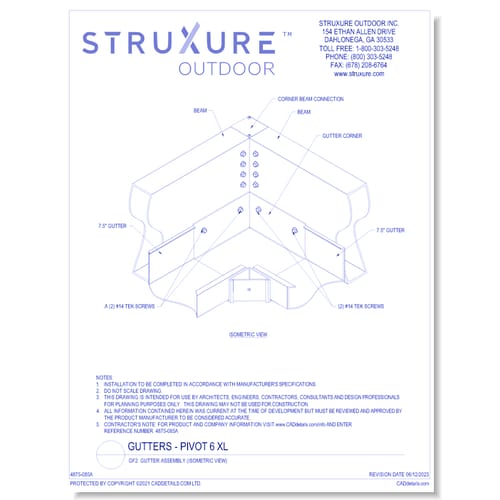 GF2: Gutter Assembly (Isometric View)
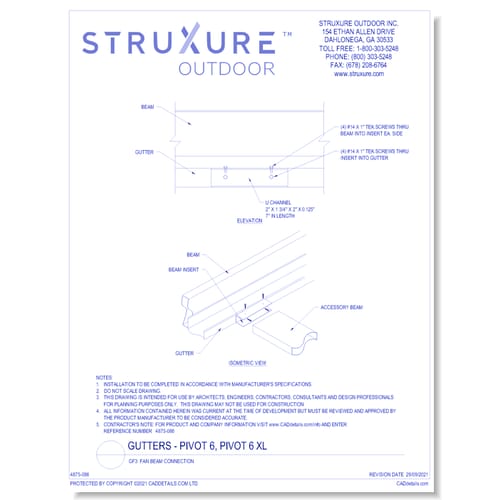 GF3: Fan Beam Connection
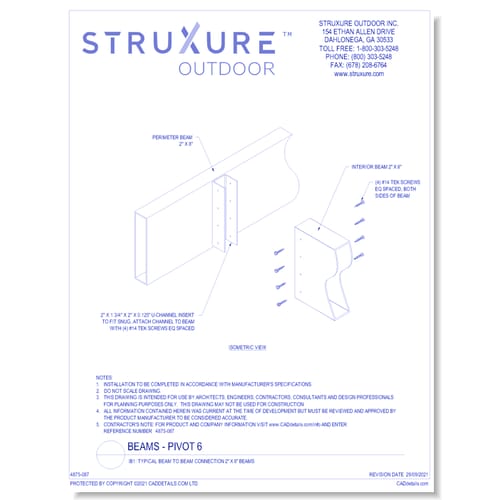 IB1: Typical Beam To Beam Connection 2'' x 8'' Beams
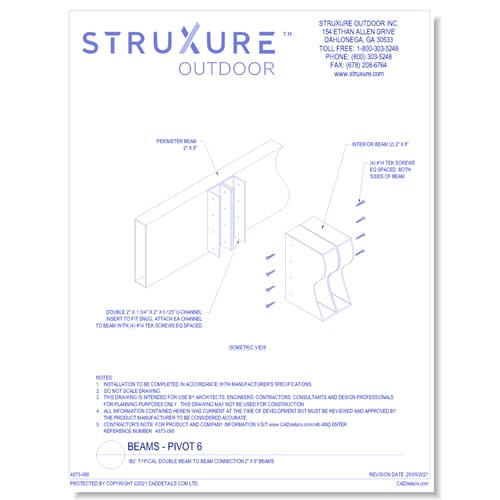 IB2: Typical Double Beam To Beam Connection 2 x 8'' Beams
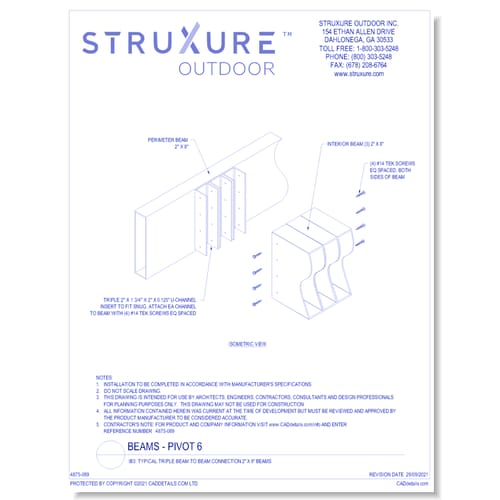 IB3: Typical Triple Beam To Beam Connection 2'' x 8'' Beams
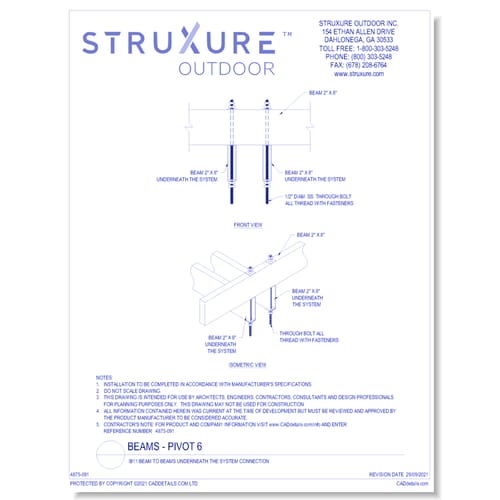 IB11: Beam To Beams Underneath The System Connection
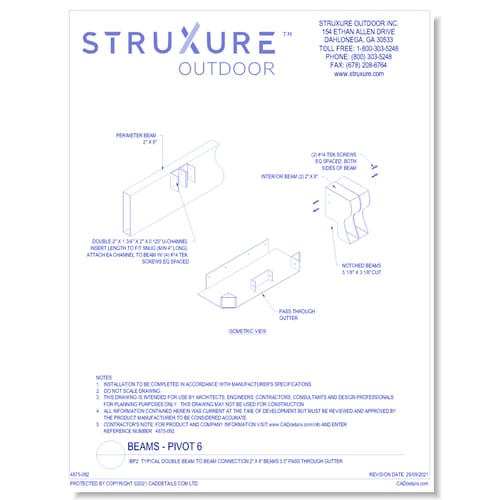 IBP2: Typical Double Beam To Beam Connection 2'' x 8'' Beams 5.5'' Pass Through Gutter
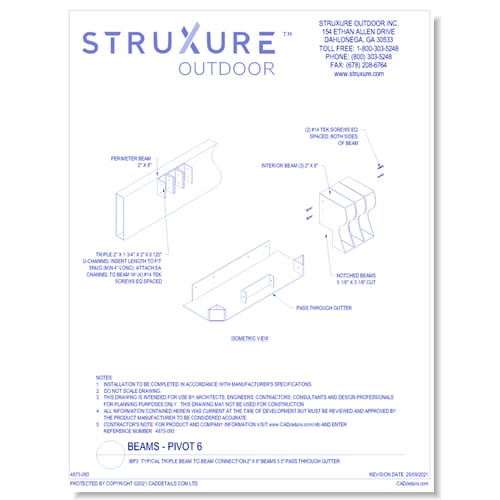 IBP3: Typical Triple Beam To Beam Connection 2'' x 8'' Beams 5.5'' Pass Through Gutter
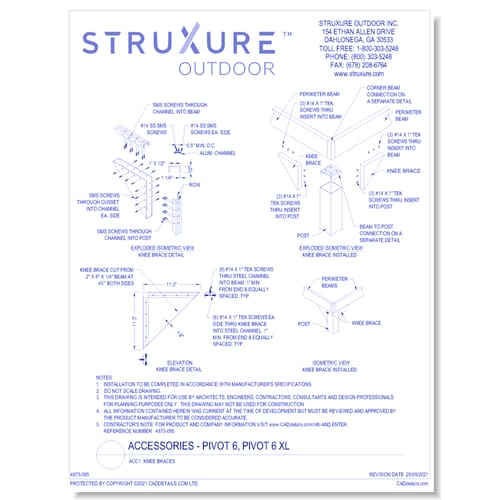 ACC1: Knee Braces
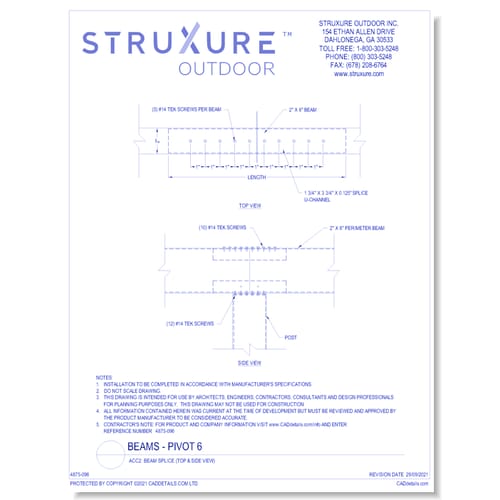 ACC2: Beam Splice (Top & Side View)
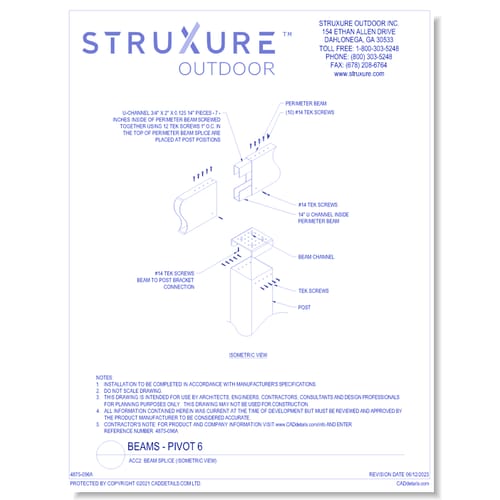 ACC2: Beam Splice (Isometric View)
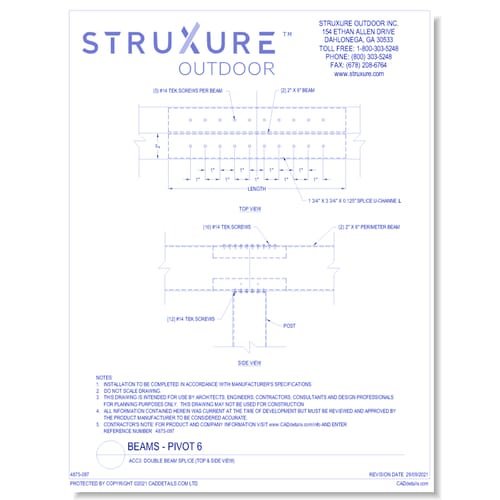 ACC3: Double Beam Splice (Top & Side View)
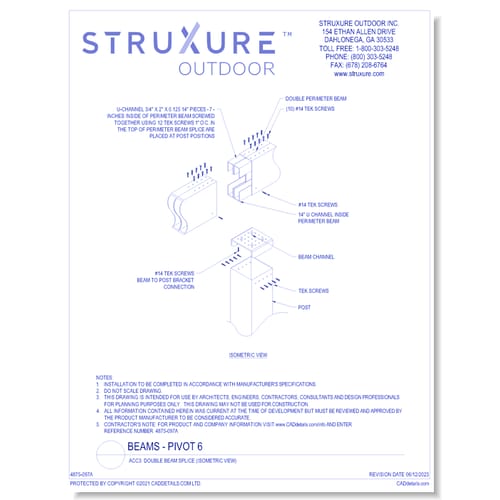 ACC3: Double Beam Splice (Isometric View)
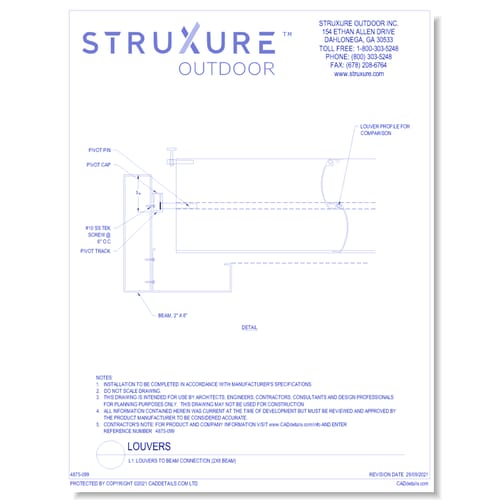 L1: Louvers To Beam Connection (2 x 8 BEAM)
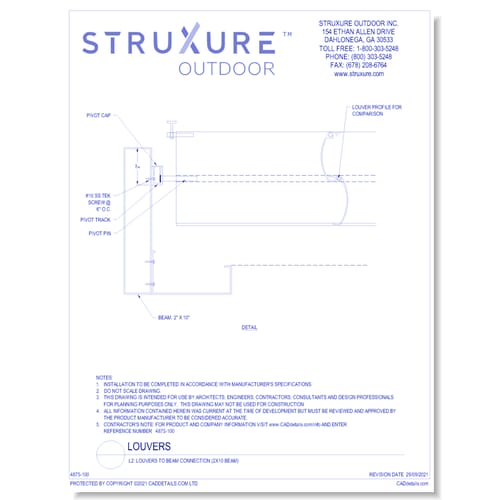 L2: Louvers To Beam Connection (2 x 10 BEAM)
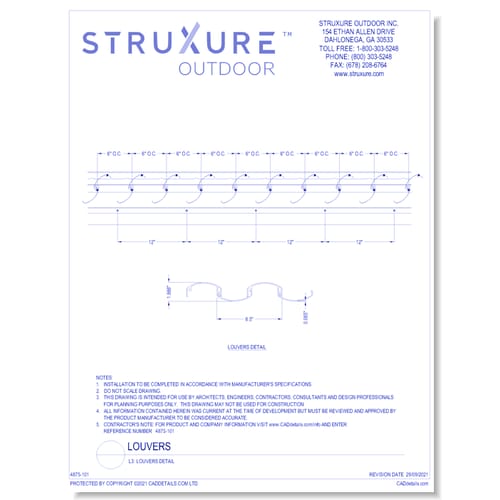 L3: Louvers Detail
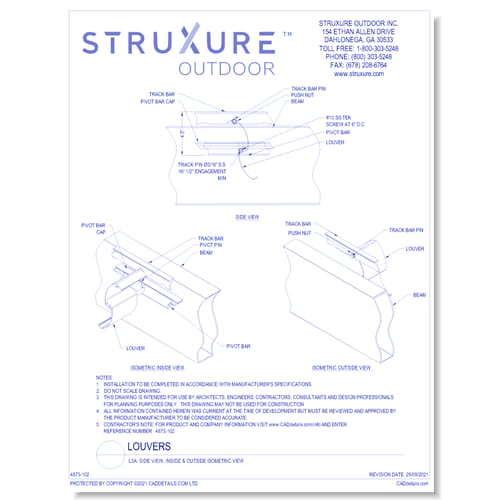 L3A: Side View
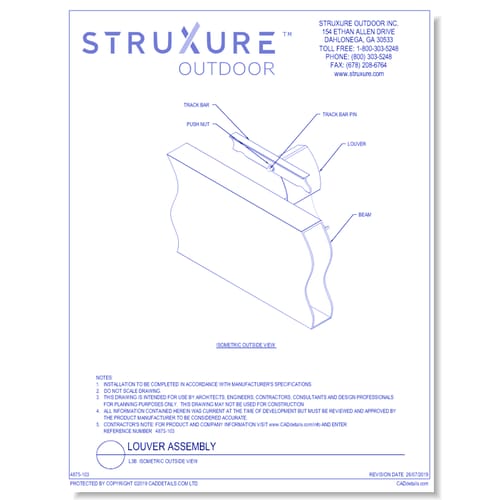 L3B: Isometric Outside View
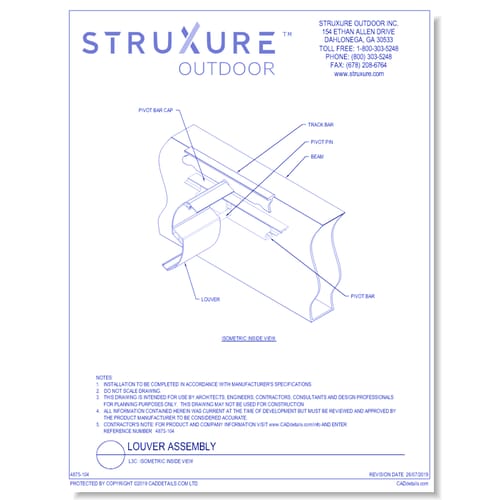 L3C: Isometric Inside View
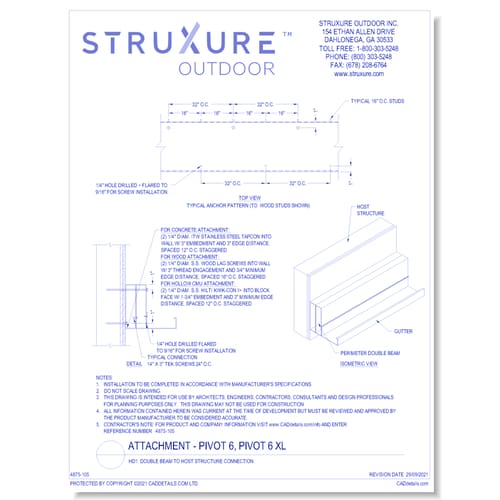 HD1: Double Beam To Host Structure Connection
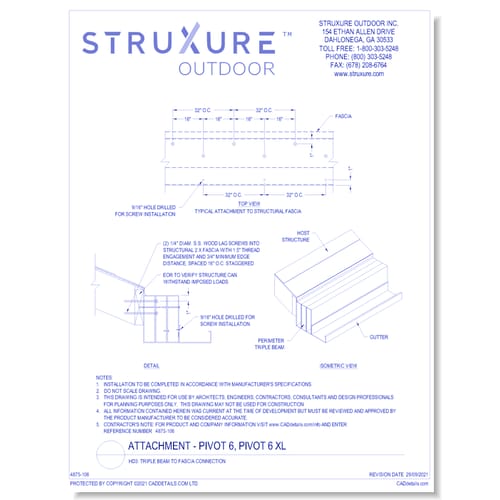 HD3: Triple Beam To Fascia Connection
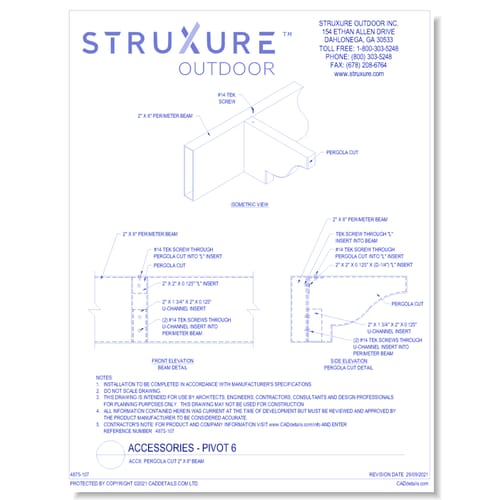 ACC6: Pergola Cut 2'' x 8'' Beam
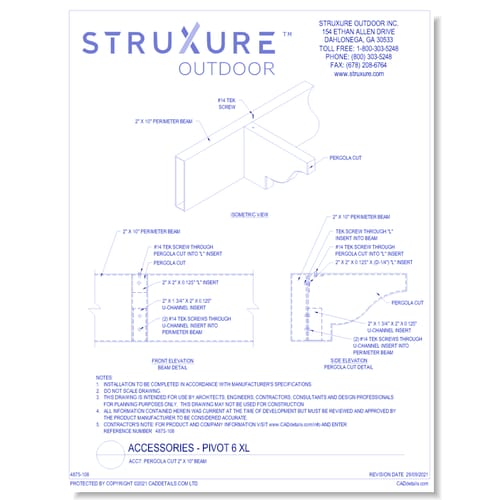 ACC7: Pergola Cut 2'' x 10'' Beam
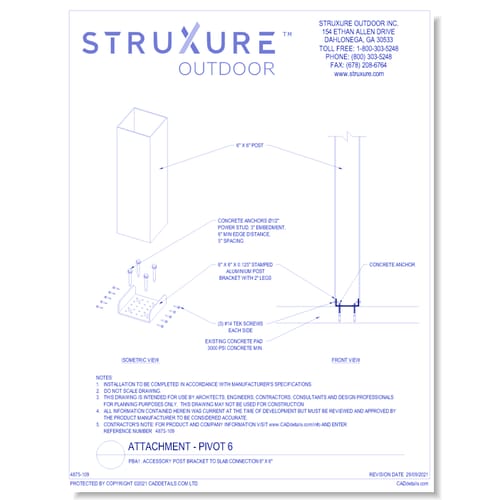 PBA1: Accessory Post Bracket To Slab Connection 6 x 6
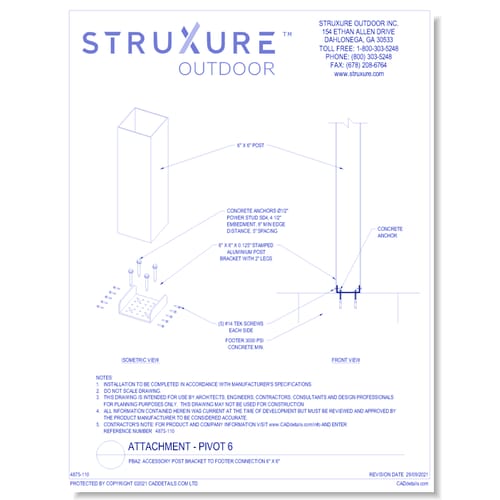 PBA2: Accessory Post Bracket To Footer Connection 6 x 6
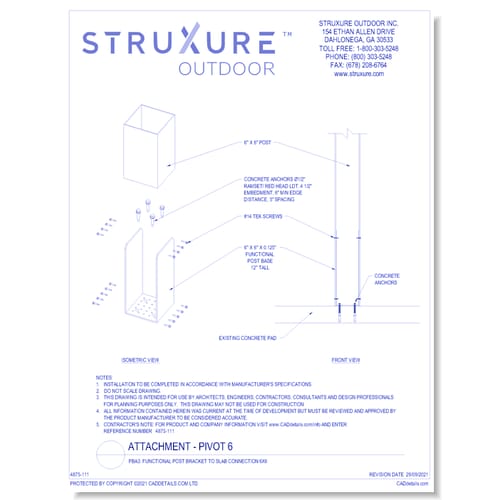 PBA3: Functional Post Bracket To Slab Connection 6 x 6
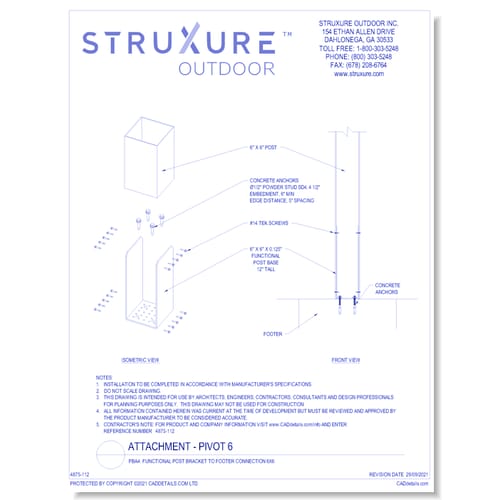 PBA4: Functional Post Bracket To Footer Connection 6 x 6
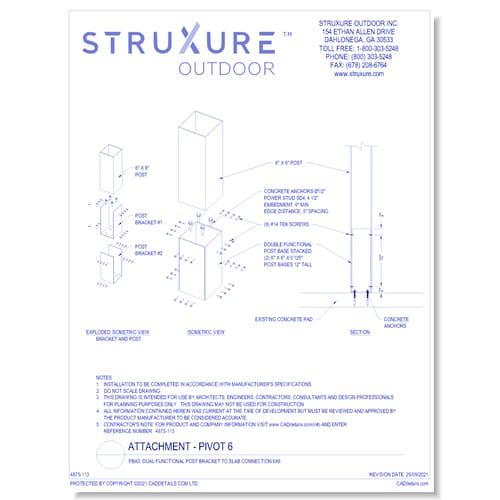 PBA5: Dual Functional Post Bracket To Slab Connection 6 x 6
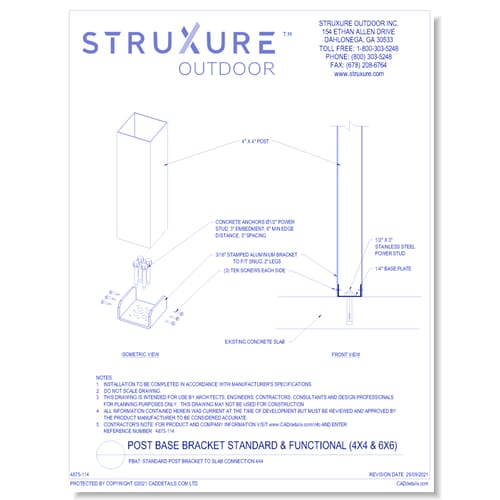 PBA7: Standard Post Bracket To Slab Connection 4 x 4
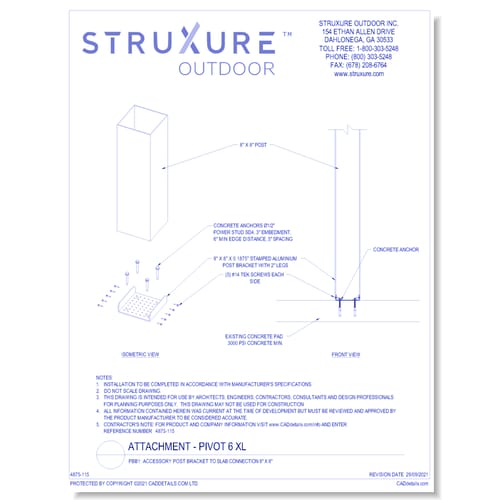 PBB1: Accessory Post Bracket To Slab Connection 8 x 8
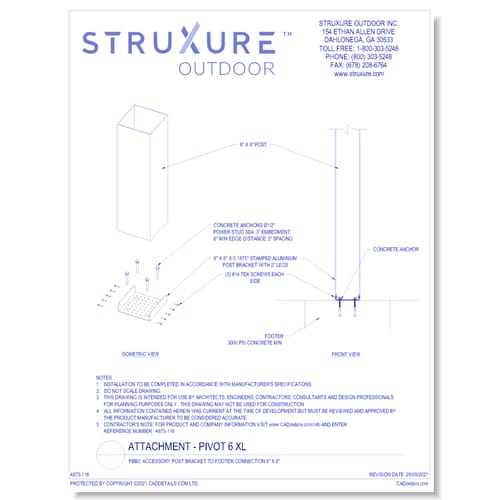 PBB2: Accessory Post Bracket To Footer Connection 8 x 8
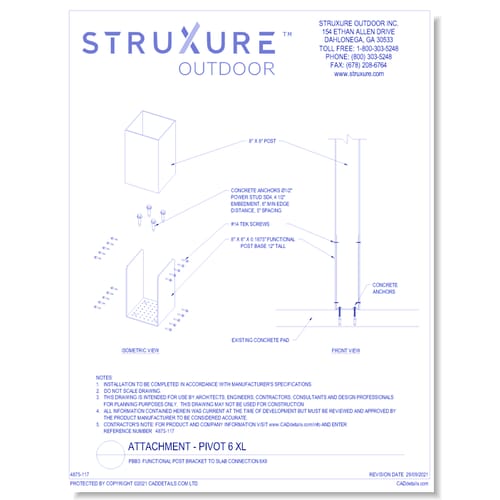 PBB3: Functional Post Bracket To Slab Connection 8 x 8
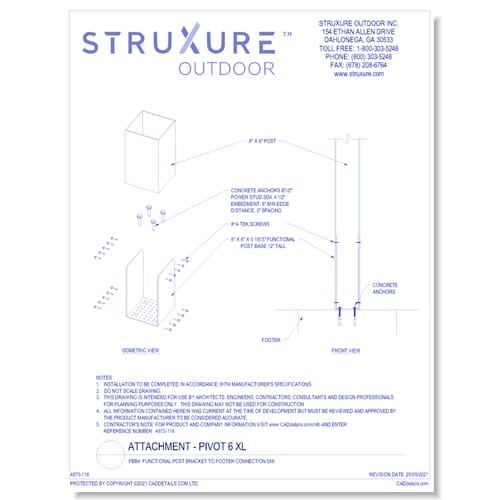 PBB4: Functional Post Bracket To Footer Connection 8 x 8
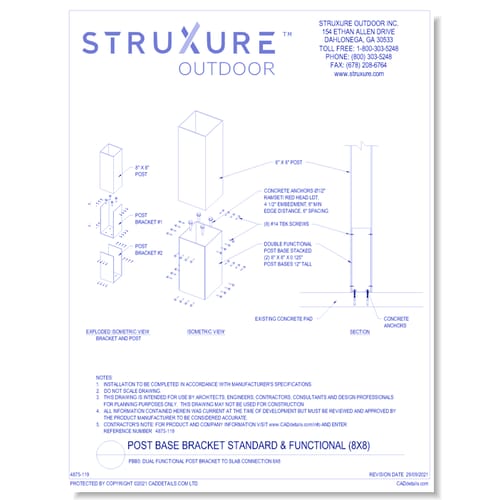 PBB5: Dual Functional Post Bracket To Slab Connection 8 x 8
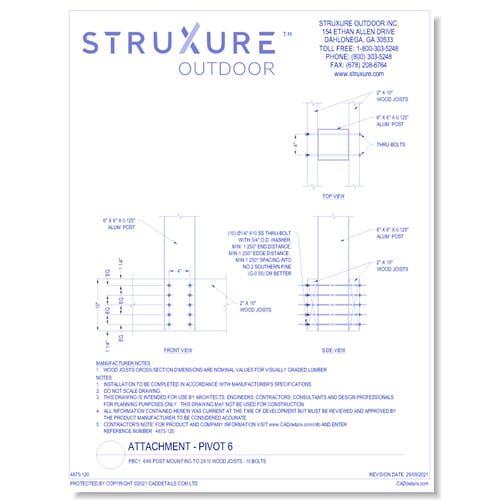 PBC1: 6 x 6 Post Mounting To 2 x 10 Wood Joists - 10 Bolts
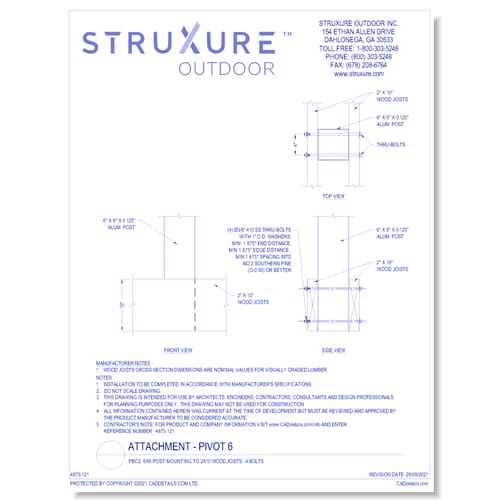 PBC2: 6 x 6 Post Mounting To 2 x 10 Wood Joists - 4 Bolts
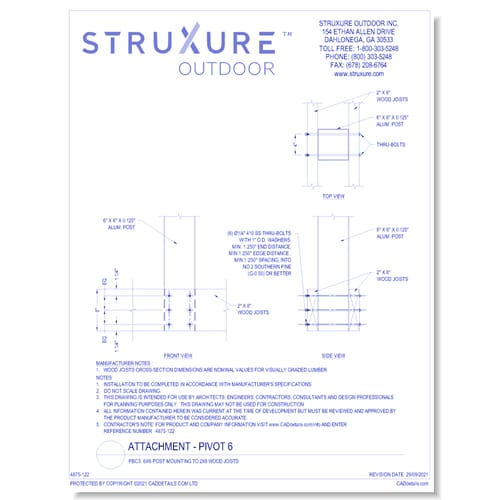 PBC3: 6 x 6 Post Mounting To 2 x 8 Wood Joists
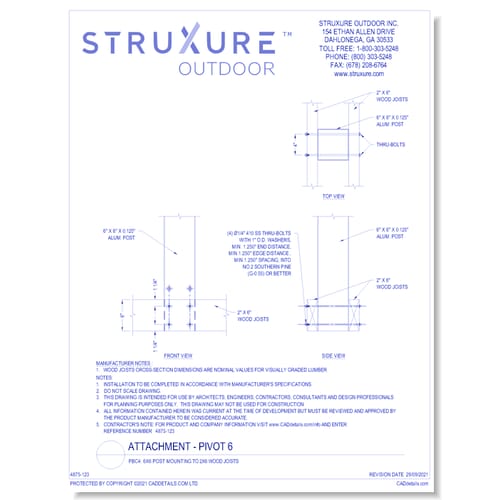 PBC4: 6 x 6 Post Mounting To 2 x 6 Wood Joists
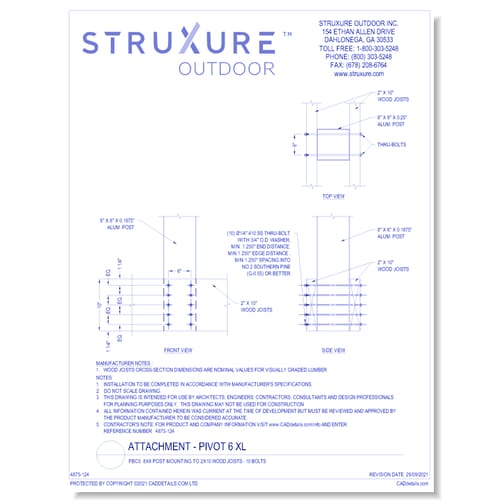 PBC5: 8 x 8 Post Mounting To 2 x 10 Wood Joists - 10 Bolts
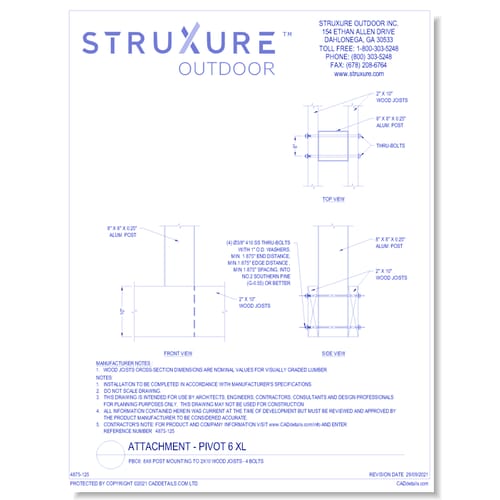 PBC6: 8 x 8 Post Mounting To 2 x 10 Wood Joists - 4 Bolts
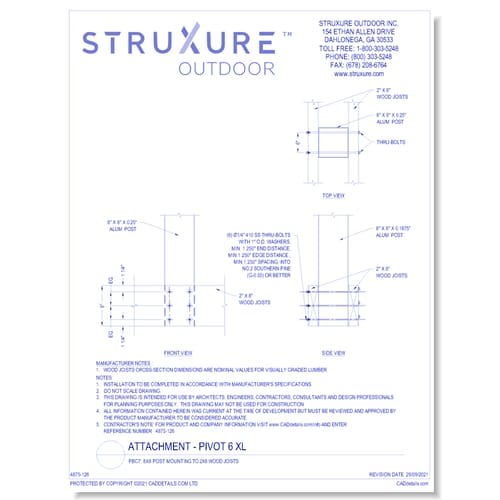 PBC7: 8 x 8 Post Mounting To 2 x 8 Wood Joists
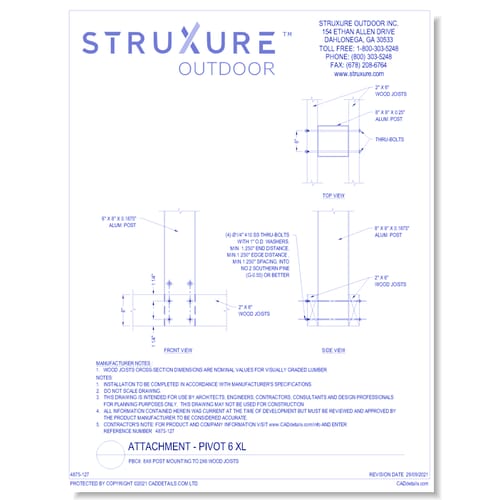 PBC8: 8 x 8 Post Mounting To 2 x 6 Wood Joists
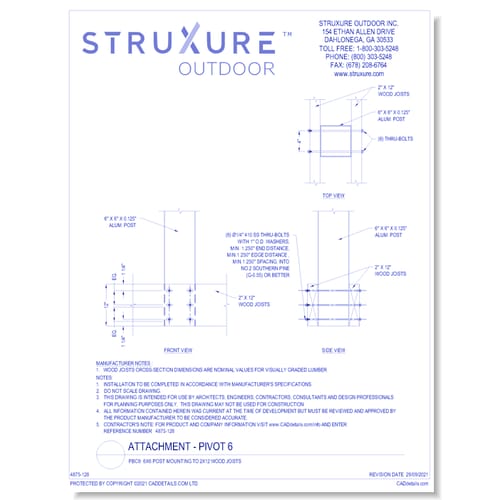 PBC9: 6 x 6 Post Mounting To 2 x 12 Wood Joists
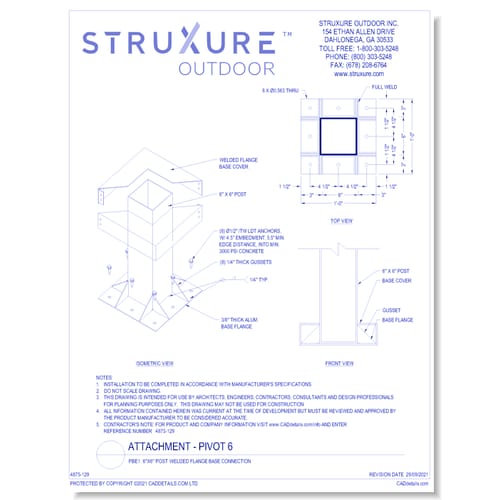 PBE1: 6 x 6 Post Welded Flange Base Connection
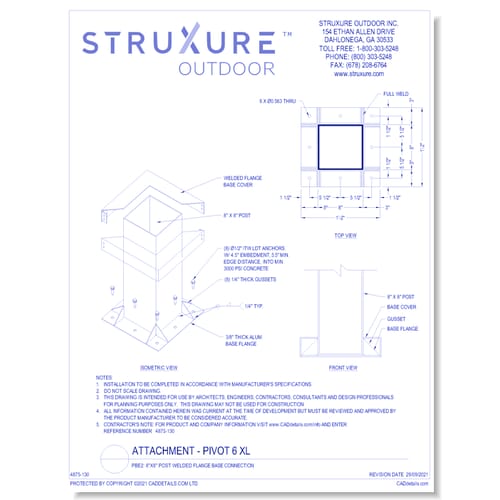 PBE2: 8 x 8 Post Welded Flange Base Connection
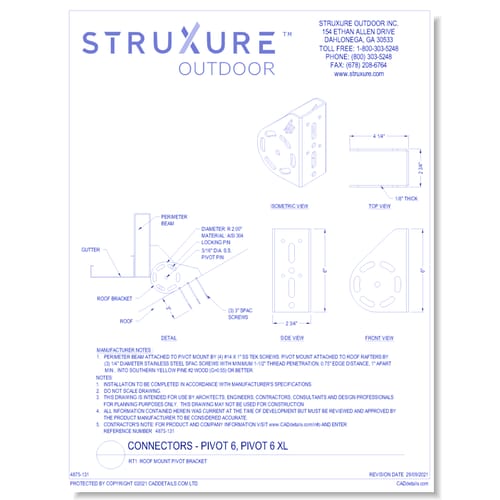 RT1: Roof Mount Pivot Bracket
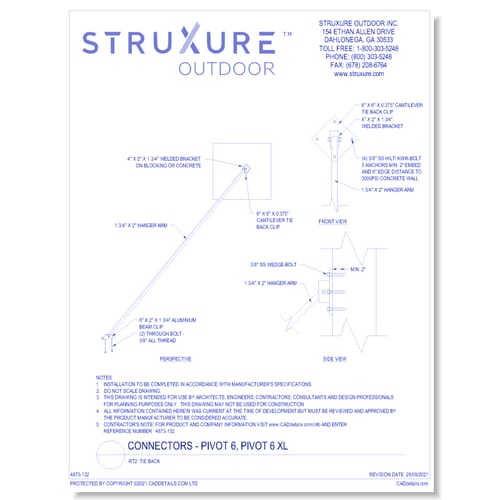 RT2: Tie Back
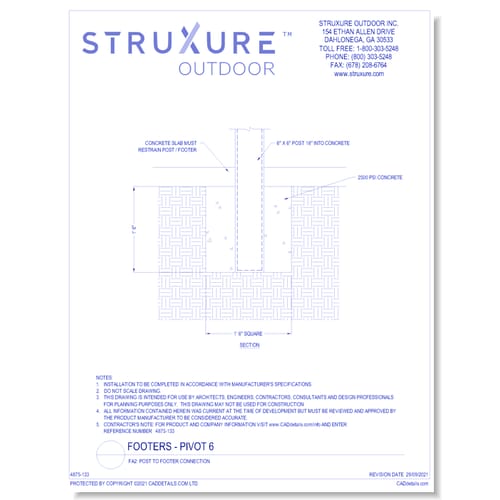 FA2: Post To Footer Connection (18 x 18)
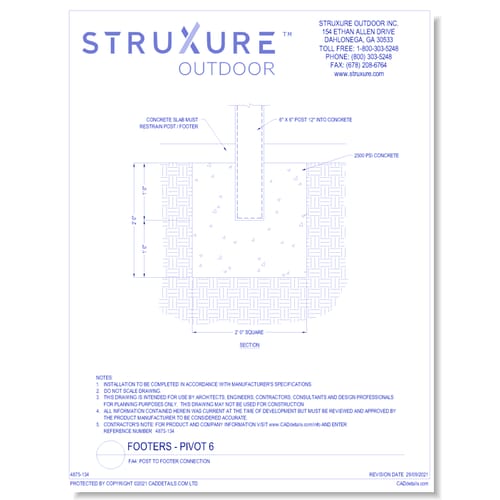 FA4: Post To Footer Connection
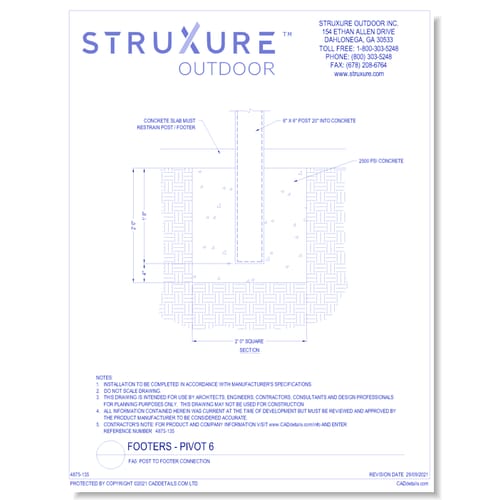 FA5: Post To Footer Connection
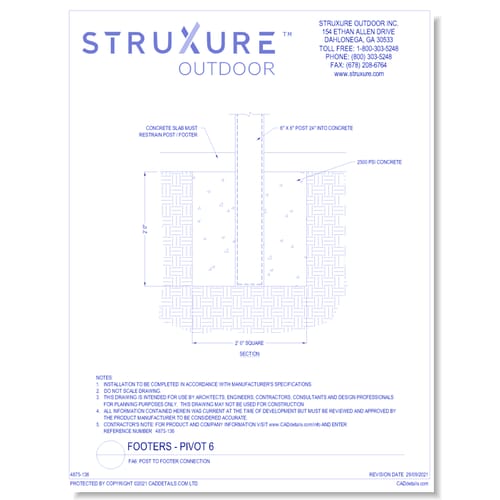 FA6: Post To Footer Connection
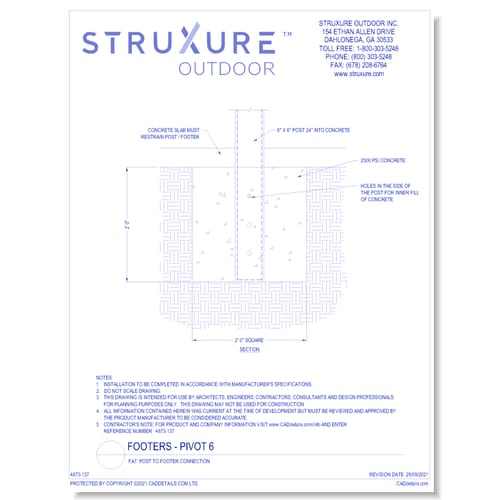 FA7: Post To Footer Connection
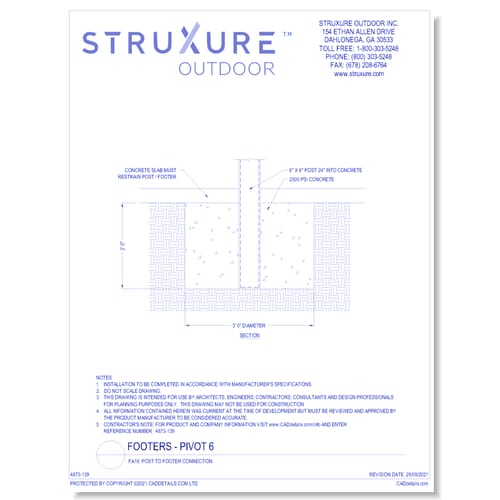 FA16: Post To Footer Connection
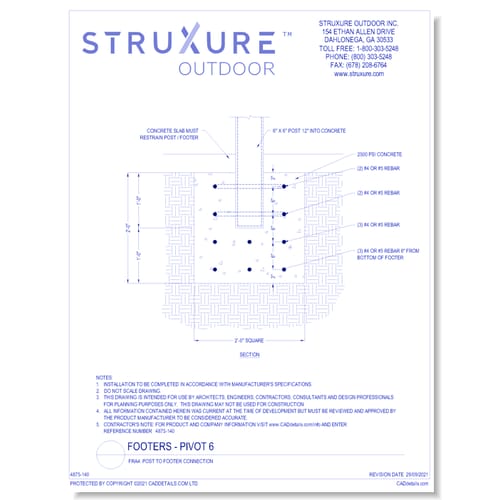 FRA4: Post To Footer Connection
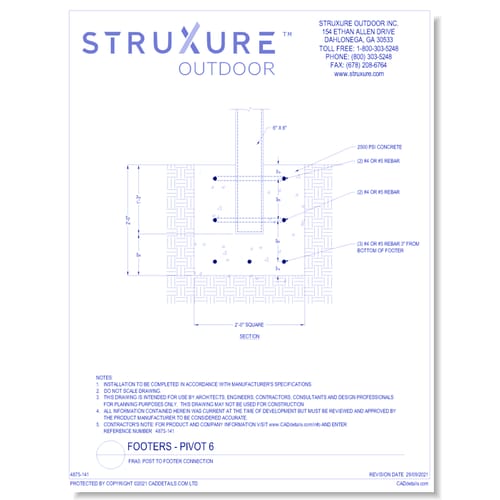 FRA5: Post To Footer Connection
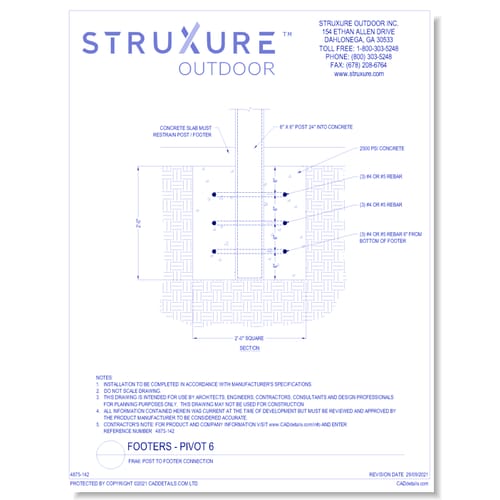 FRA6: Post To Footer Connection
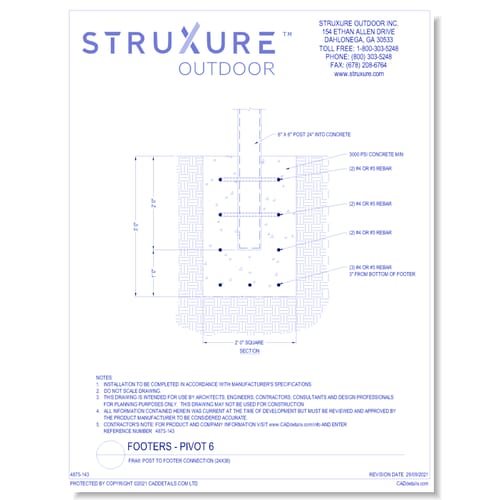 FRA9: Post To Footer Connection (24 x 36)
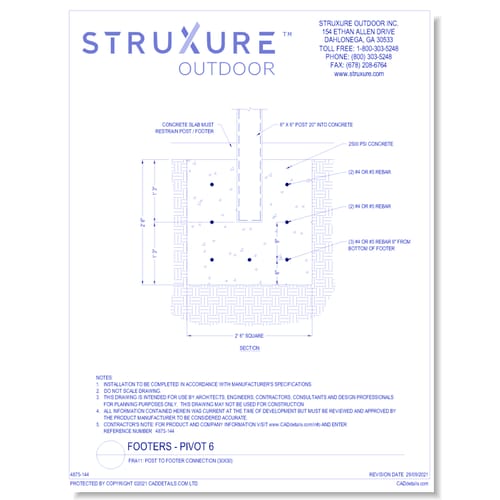 FRA11: Post To Footer Connection (30 x 30)
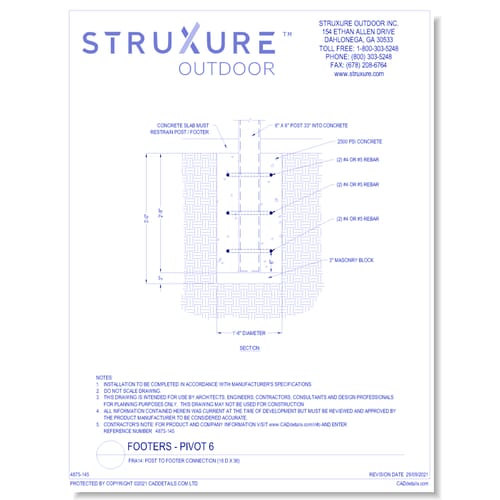 FRA14: Post To Footer Connection (18 D x 36)
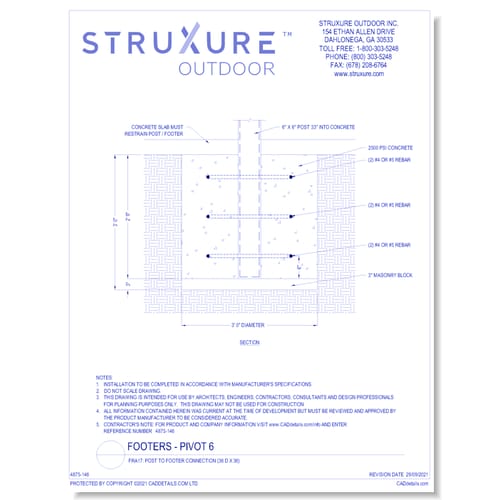 FRA17: Post To Footer Connection (36 D x 36)
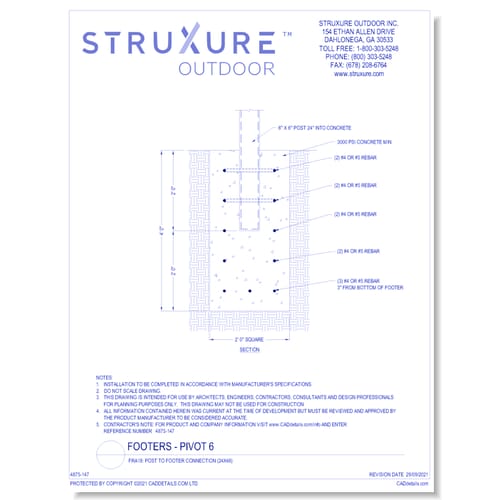 FRA18: Post To Footer Connection (24 x 48)
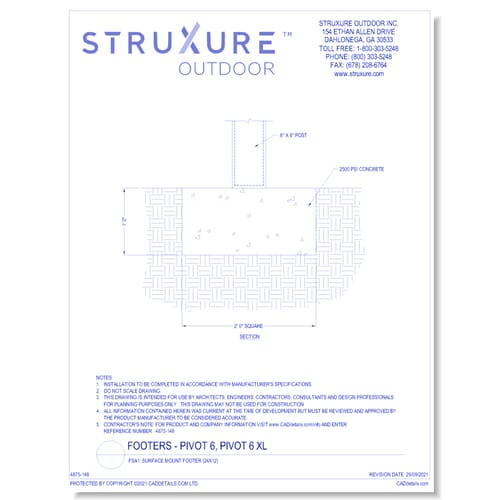 FSA1: Surface Mount Footer (24 x 12)
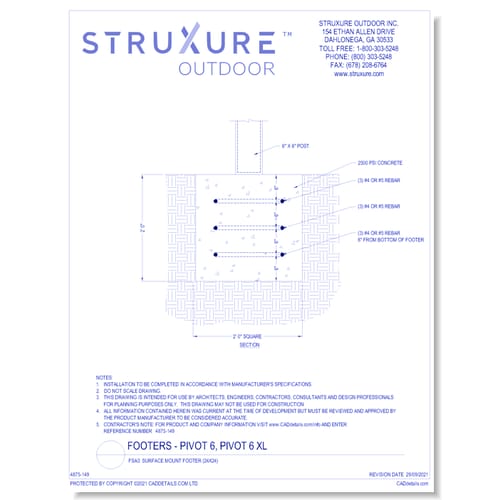 FSA3: Surface Mount Footer (24 x 24)
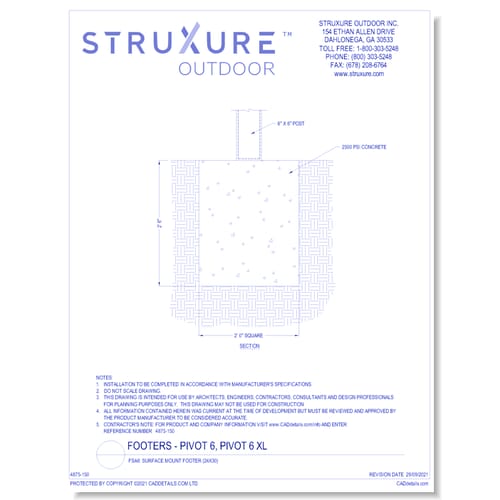 FSA8: Surface Mount Footer (24 x 30)
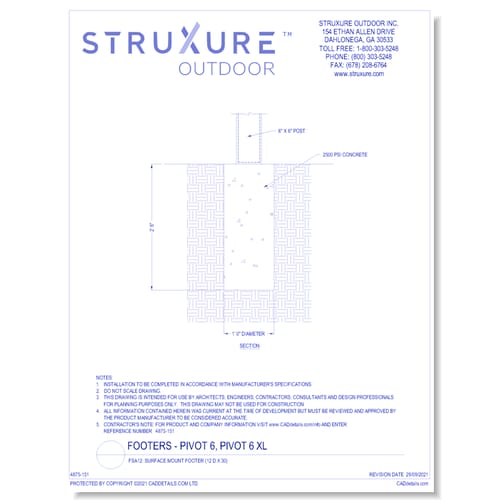 FSA12: Surface Mount Footer (12 D x 30)
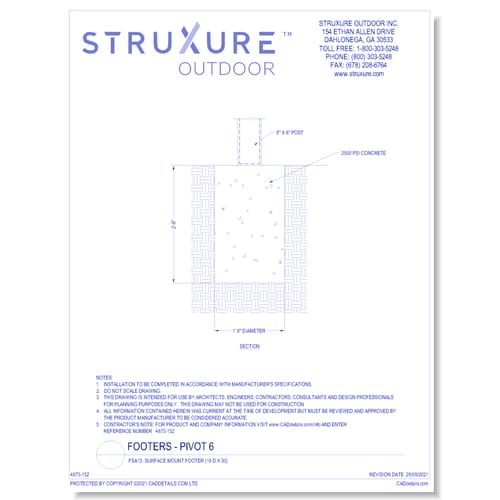 FSA15: Surface Mount Footer (18 D x 30)
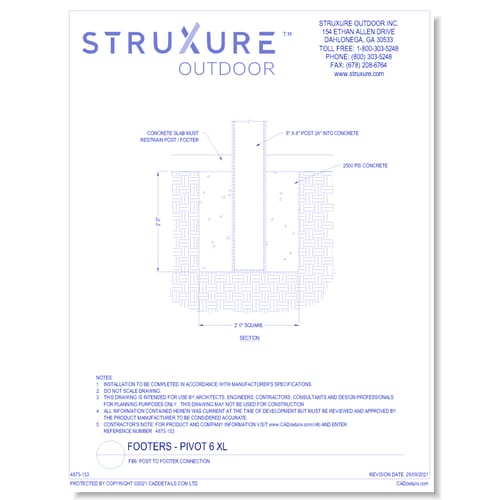 FB6: Post To Footer Connection
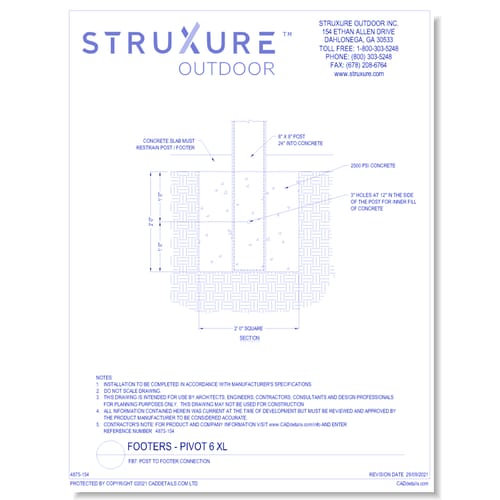 FB7: Post To Footer Connection
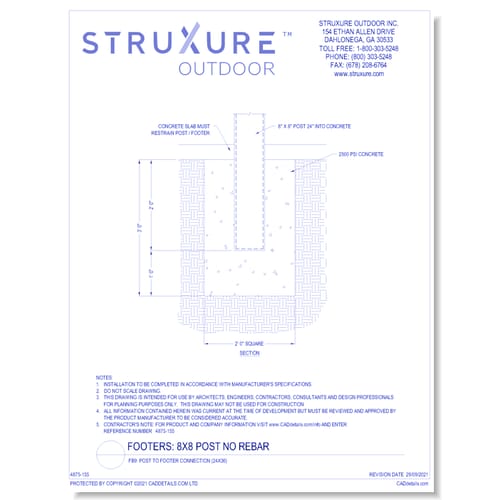 FB9: Post To Footer Connection (24 x 36)
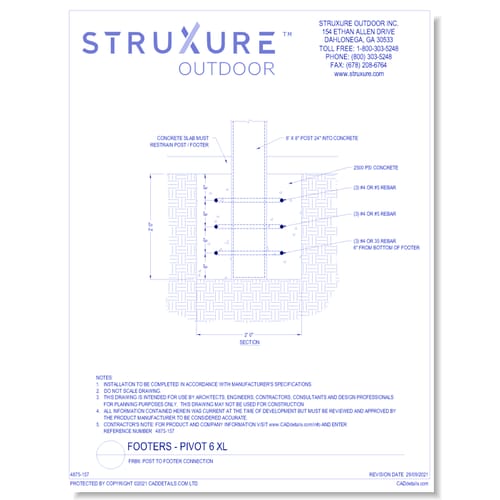 FRB6: Post To Footer Connection
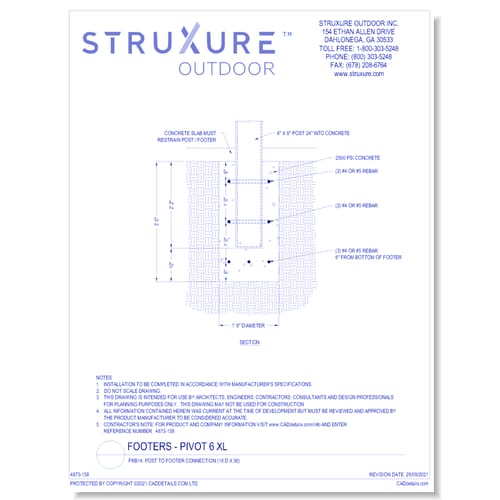 FRB14: Post To Footer Connection (18 D x 36)
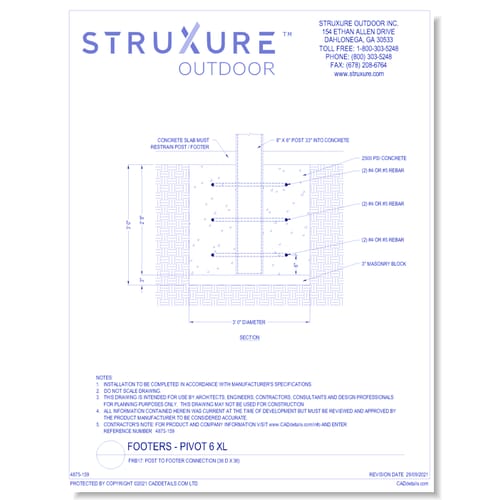 FRB17: Post To Footer Connection (36 D x 36)
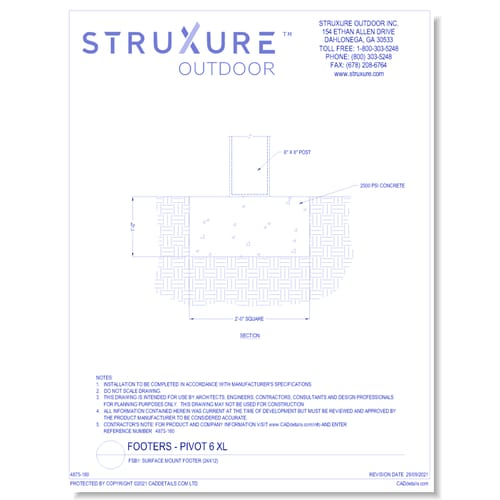 FSB1: Surface Mount Footer (24 x 12)
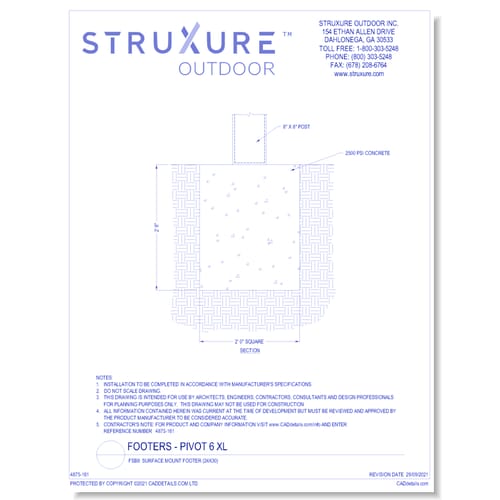 FSB8: Surface Mount Footer (24 x 30)
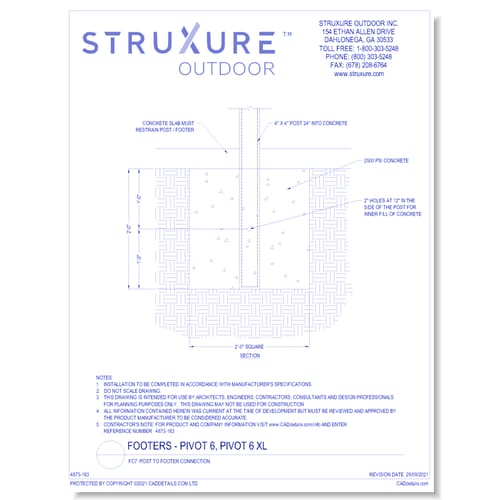 FC7: Post To Footer Connection
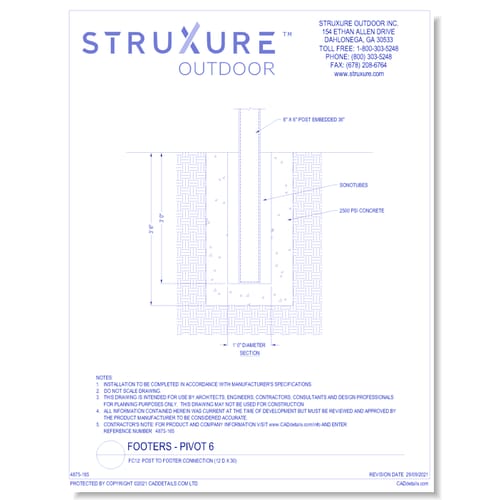 FC12: Post To Footer Connection (12 D x 30)
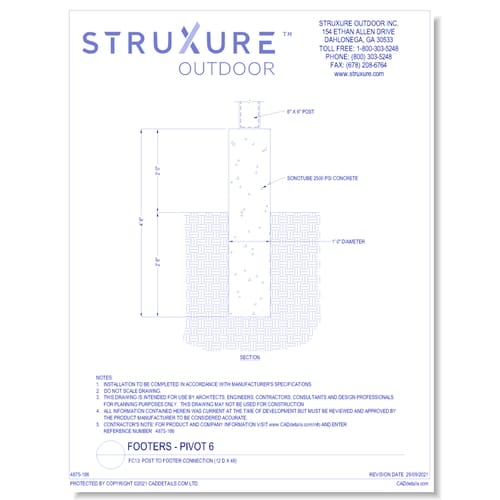 FC13: Post To Footer Connection (12 D x 48)
 Master Document
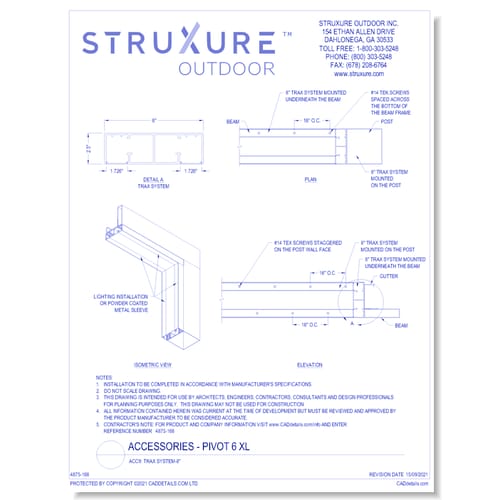 ACC9: Trax System - 8"
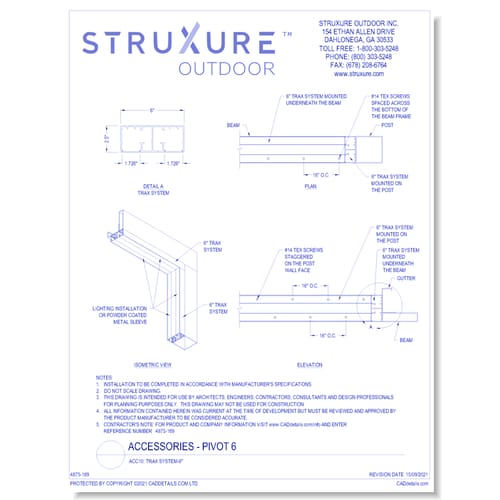 ACC10: Trax System - 6"
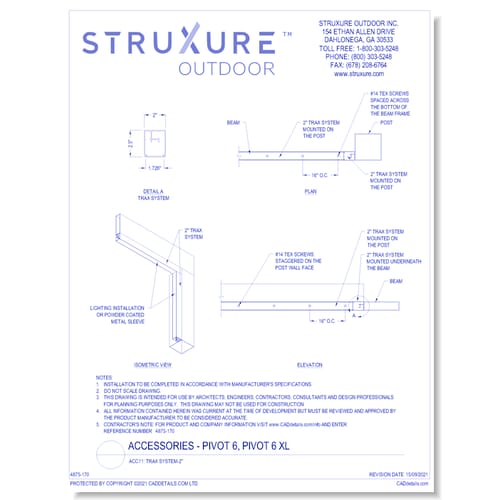 ACC11: Trax System - 2"
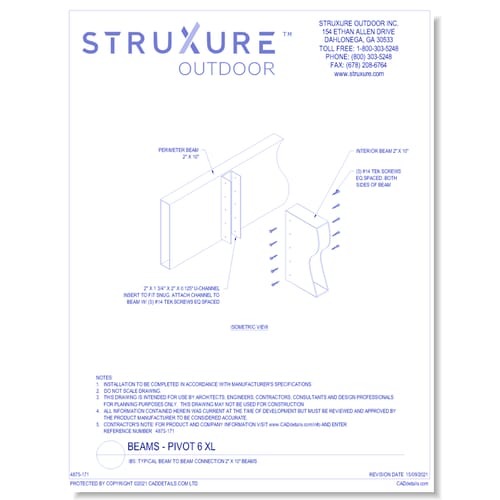 IB5: Typical Beam To Beam Connection 2" X 10" Beams
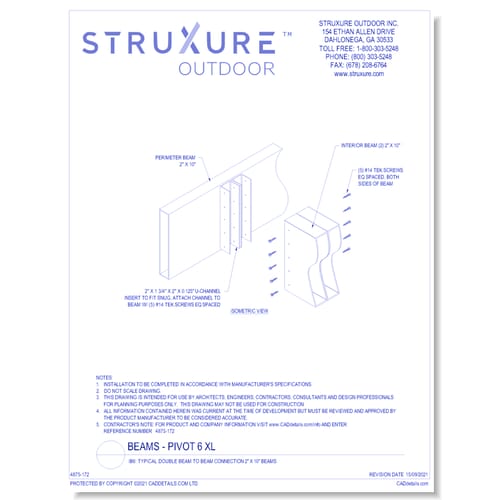 IB6: Typical Double Beam To Beam Connection 2" X 10" Beams
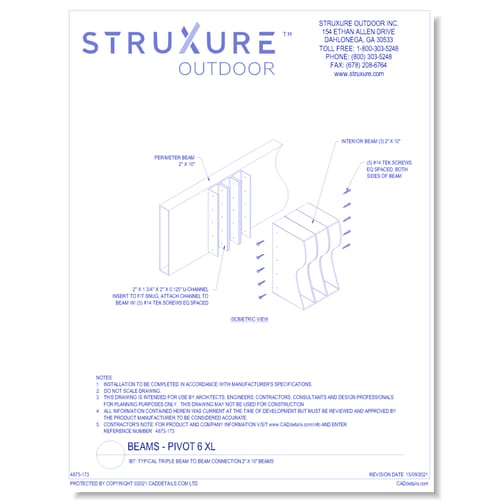 IB7: Typical Triple Beam To Beam Connection 2" X 10" Beams
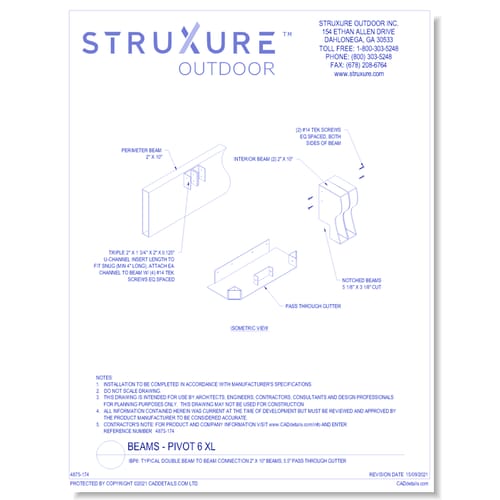 IBP6: Typical Double Beam To Beam Connection 2" X 10" Beams, 5.5" Pass Through Gutter
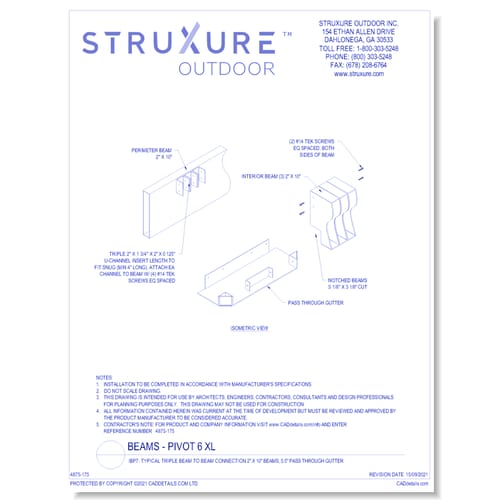 IBP7: Typical Triple Beam To Beam Connection 2" X 10" Beams, 5.5" Pass Through Gutter
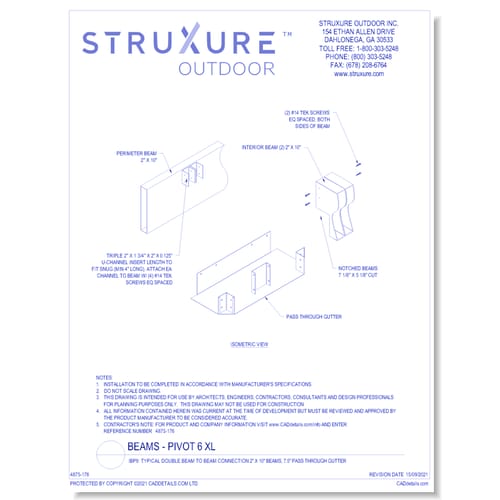 IBP9: Typical Double Beam To Beam Connection 2" X 10" Beams, 7.5" Pass Through Gutter
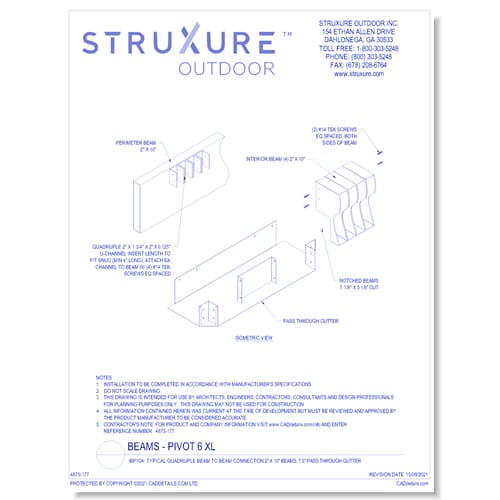 IBP10A: Typical Quadruple Beam To Beam Connection 2" X 10" Beams, 7.5" Pass Through Gutter
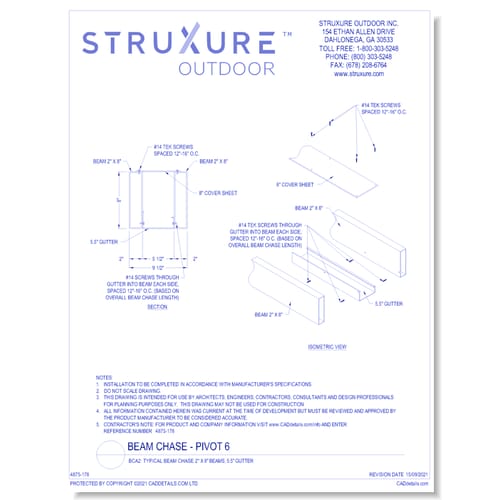 BCA2: Typical Beam Chase 2" X 8" Beams, 5.5" Gutter
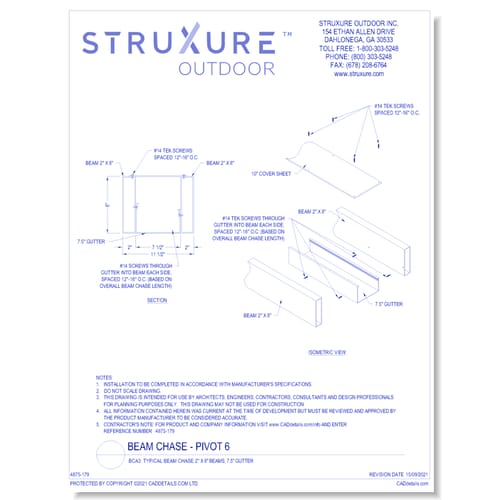 BCA3: Typical Beam Chase 2" X 8" Beams, 7.5" Gutter
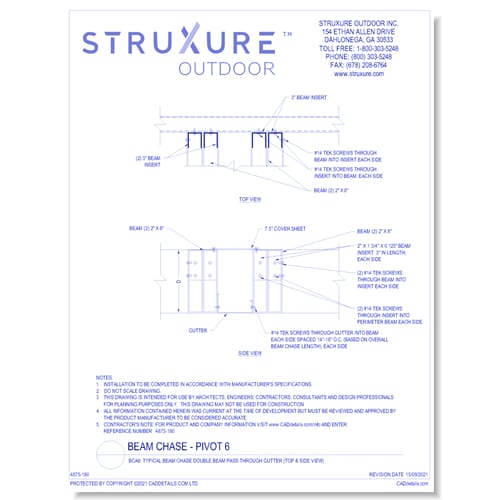 BCA6: Typical Beam Chase Double Beam Pass Through Gutter (Top & Side View)
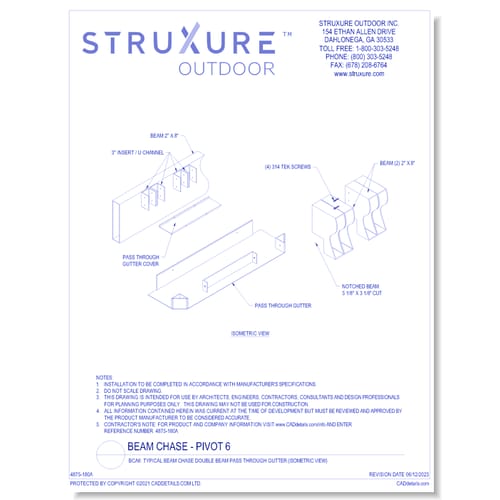 BCA6: Typical Beam Chase Double Beam Pass Through Gutter (Isometric View)
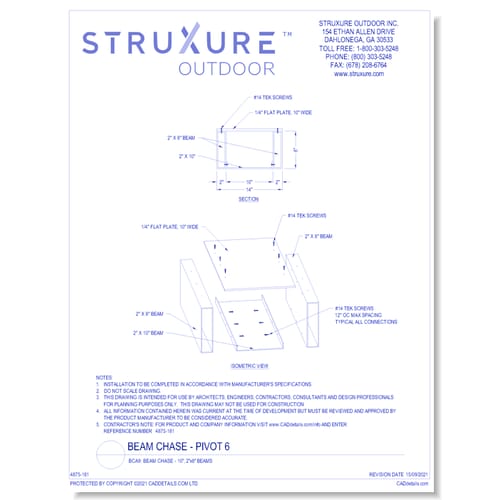 BCA9: Beam Chase - 10", 2" X 8" Beams
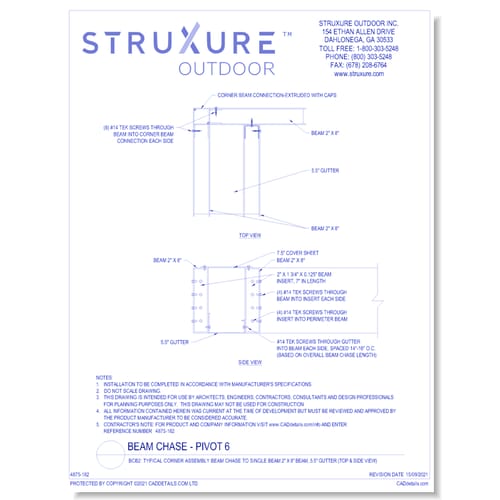 BCB2: Typical Corner Assembly Beam Chase To Single Beam 2" X 8" Beam, 5.5" Gutter (Top & Side View)
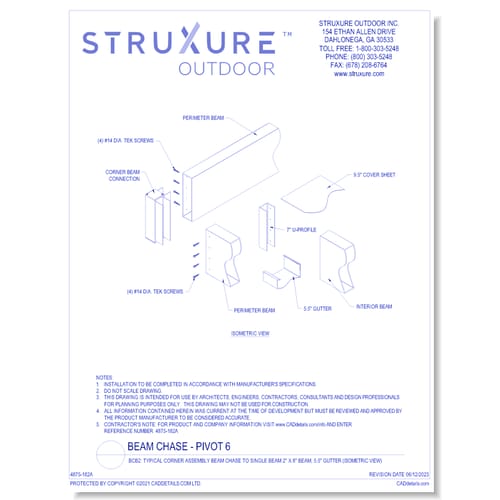 BCB2: Typical Corner Assembly Beam Chase To Single Beam 2" X 8" Beam, 5.5" Gutter (Isometric View)
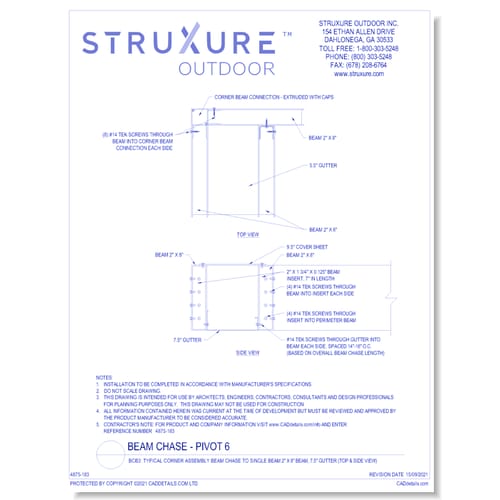 BCB3: Typical Corner Assembly Beam Chase To Single Beam 2" X 8" Beam, 7.5" Gutter (Top & Side View)
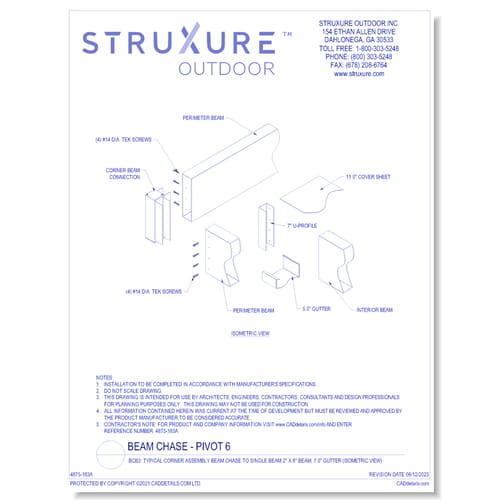 BCB3: Typical Corner Assembly Beam Chase To Single Beam 2" X 8" Beam, 7.5" Gutter (Isometric View)
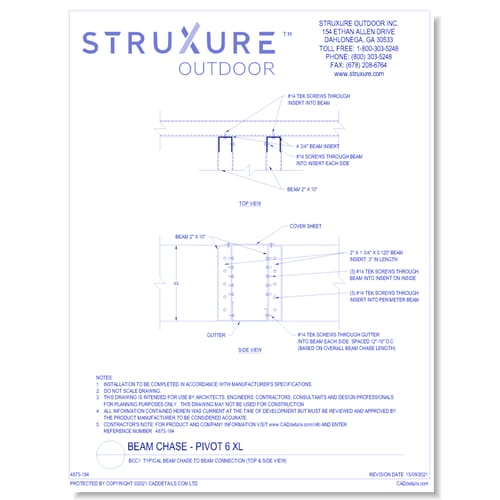 BCC1: Typical Beam Chase To Beam Connection (Top & Side View)
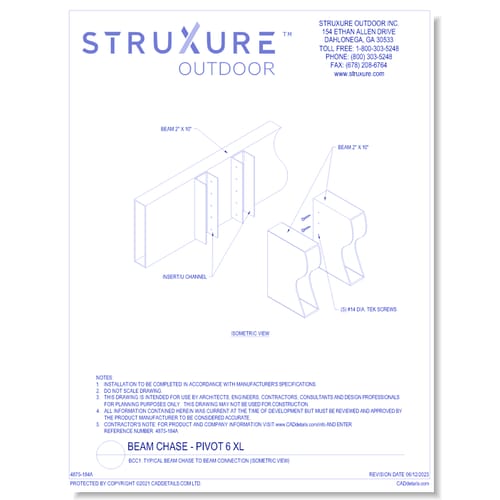 BCC1: Typical Beam Chase To Beam Connection (Isometric View)
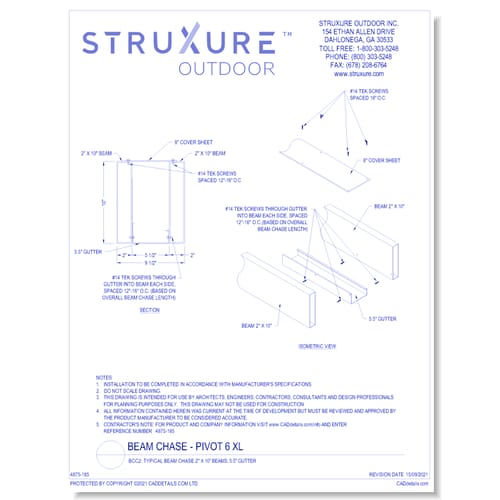 BCC2: Typical Beam Chase 2" X 10" Beams, 5.5" Gutter
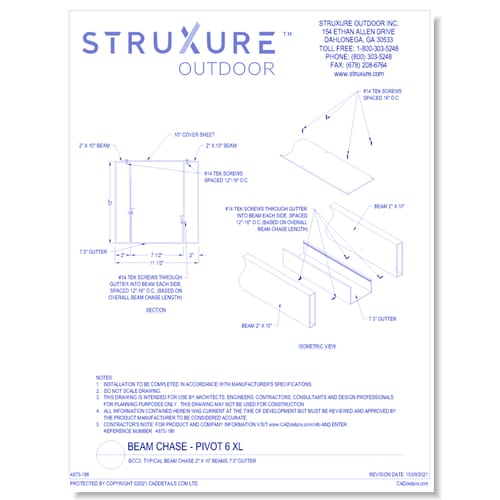 BCC3: Typical Beam Chase 2" X 10" Beams, 7.5" Gutter
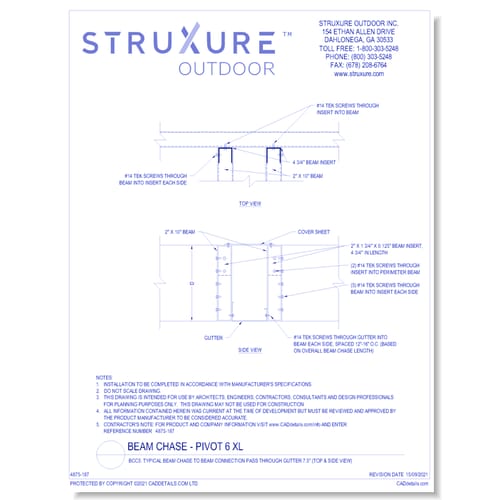 BCC5: Typical Beam Chase To Beam Connection Pass Through Gutter 7.5" (Top & Side View)
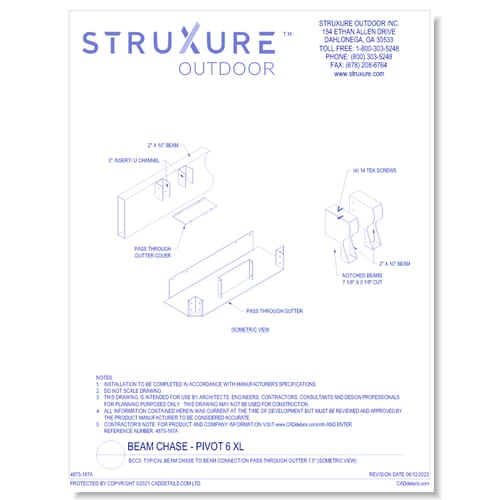 BCC5: Typical Beam Chase To Beam Connection Pass Through Gutter 7.5" (Isometric View)
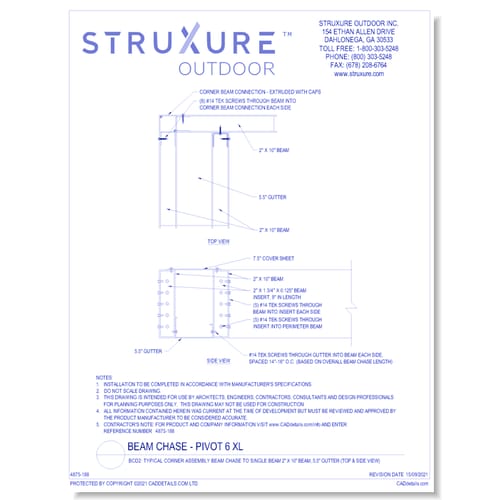 BCD2: Typical Corner Assembly Beam Chase To Single Beam 2" X 10" Beam, 5.5" Gutter (Top & Side View)
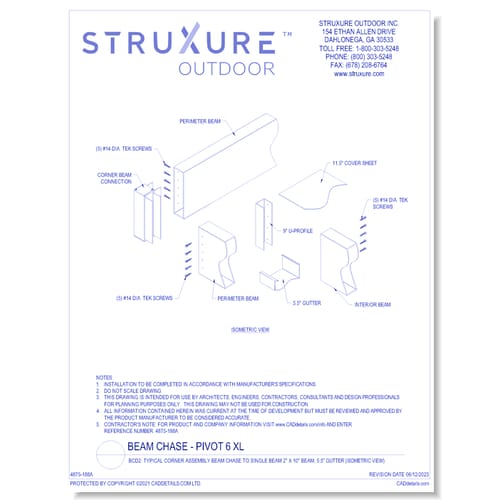 BCD2: Typical Corner Assembly Beam Chase To Single Beam 2" X 10" Beam, 5.5" Gutter (Isometric View)
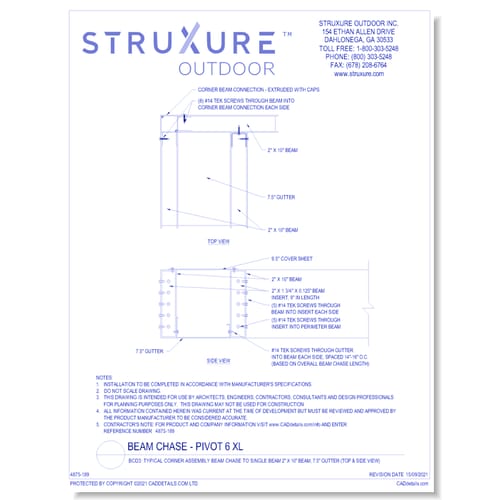 BCD3: Typical Corner Assembly Beam Chase To Single Beam 2" X 10" Beam, 7.5" Gutter (Top & Side View)
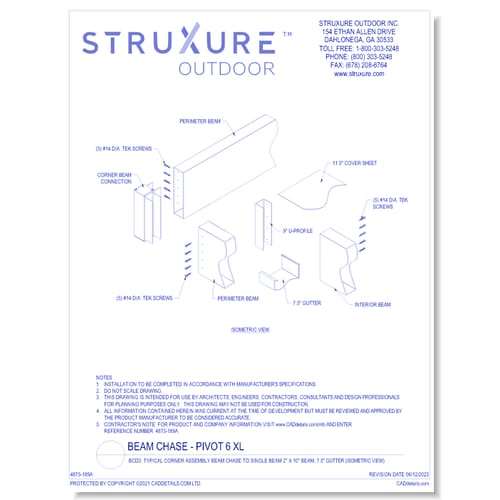 BCD3: Typical Corner Assembly Beam Chase To Single Beam 2" X 10" Beam, 7.5" Gutter (Isometric View)
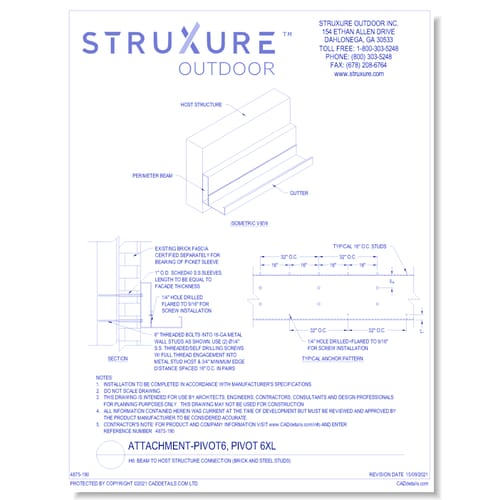 H6: Beam To Host Structure Connection (Brick And Steel Studs)
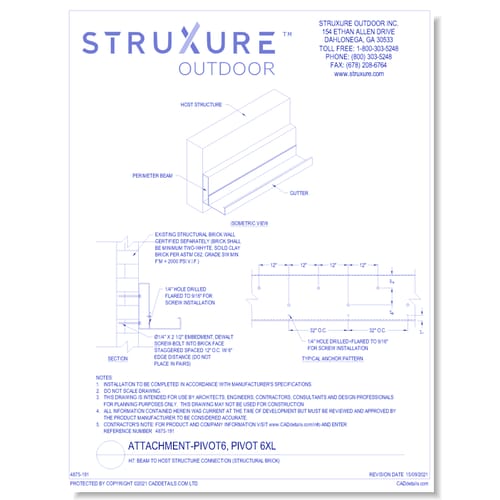 H7: Beam To Host Structure Connection (Structural Brick)
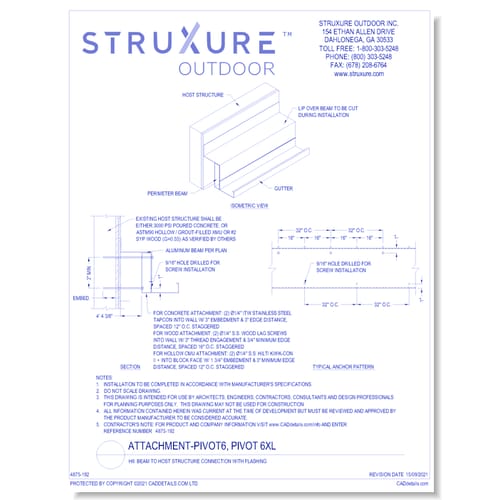 H8: Beam To Host Structure Connection With Flashing
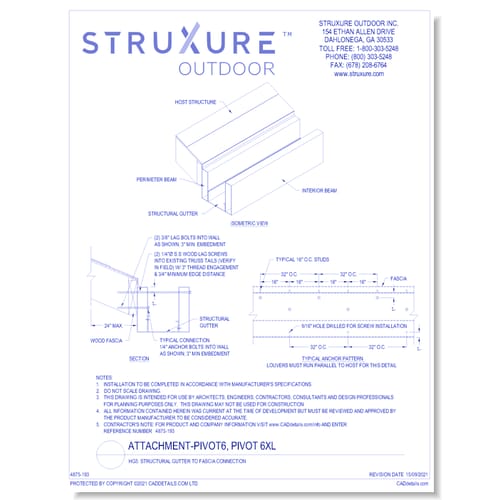 HG5: Structural Gutter To Fascia Connection
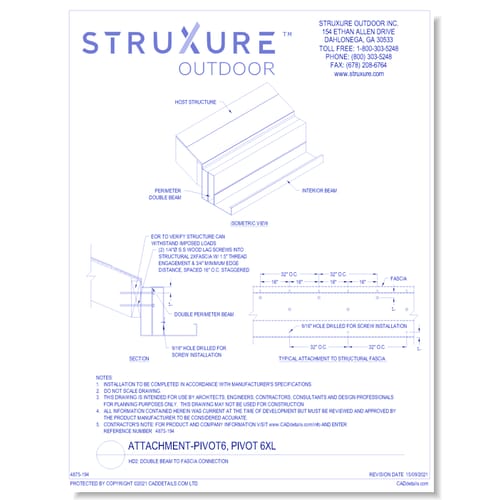 HD2: Double Beam To Fascia Connection
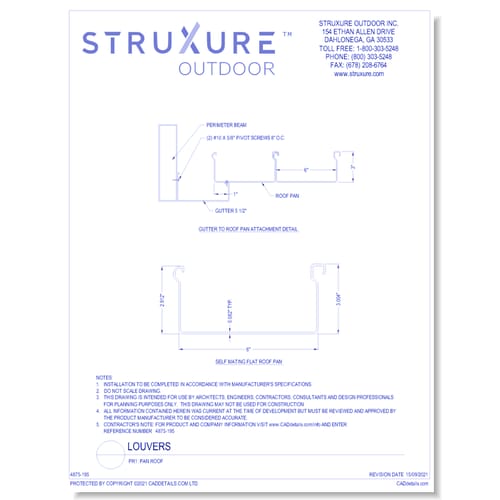 PR1: Pan Roof
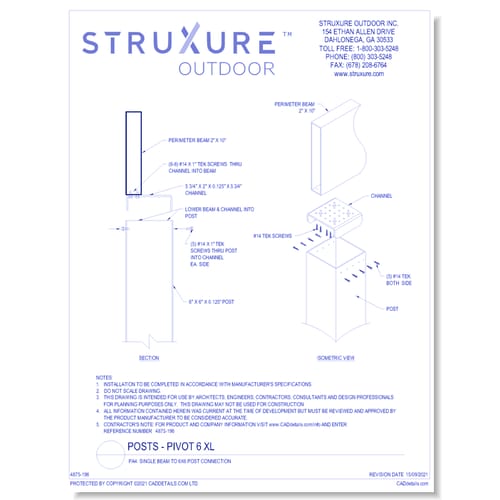 PA4: Single Beam To 6 x 6 Post Connection
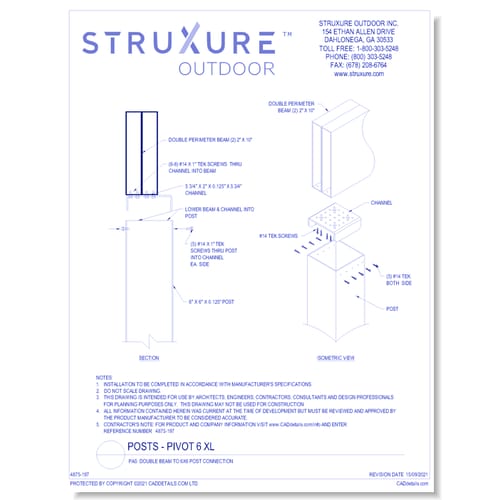 PA5: Double Beam To 6 x 6 Post Connection
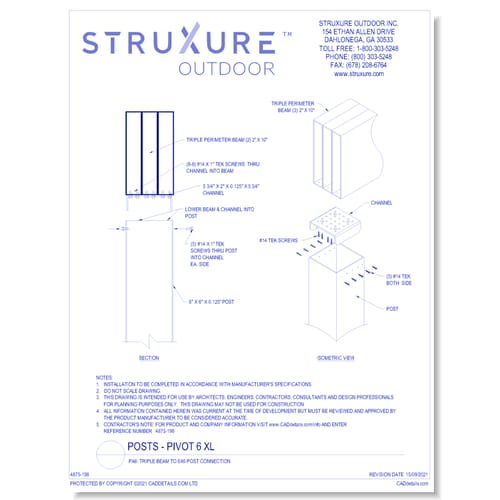 PA6: Triple Beam To 6 x 6 Post Connection
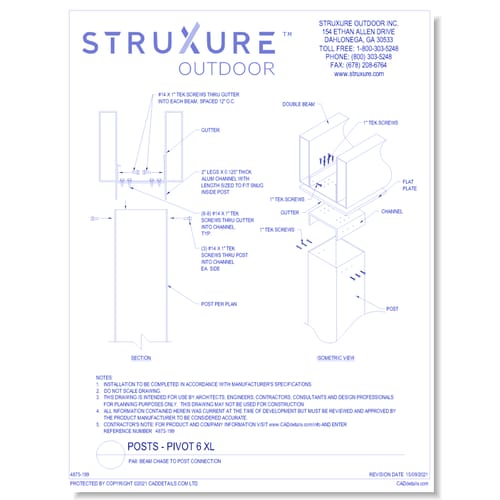 PA8: Beam Chase To Post Connection
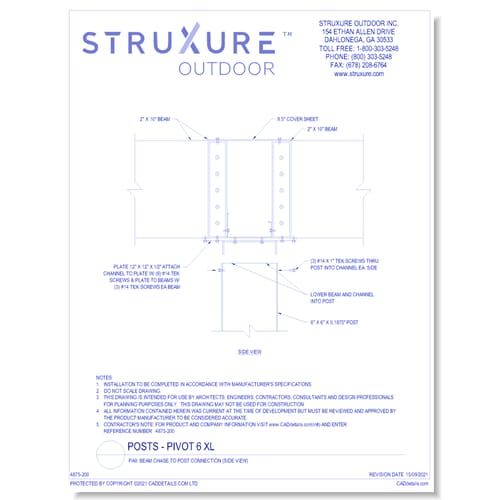 PA9: Beam Chase To Post Connection (Side View)
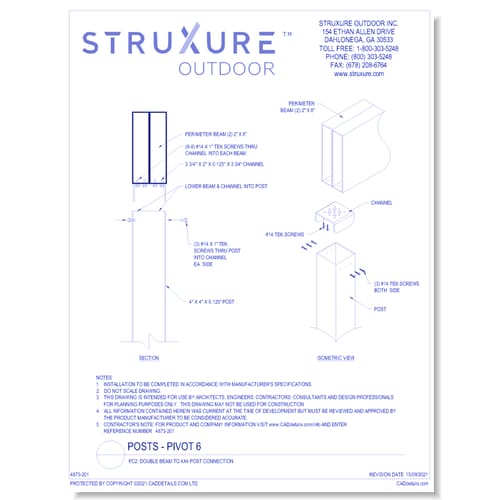 PC2: Double Beam To 4 x 4 Post Connection
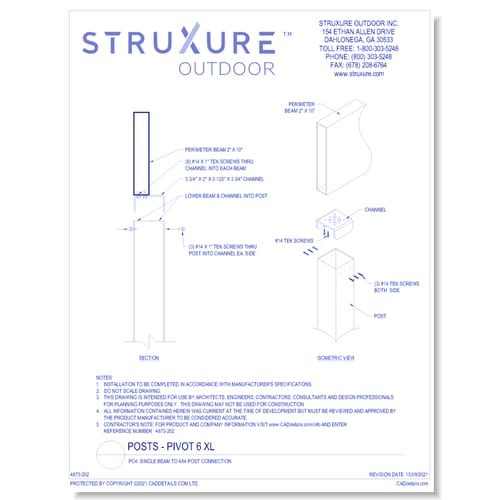 PC4: Single Beam To 4 x 4 Post Connection
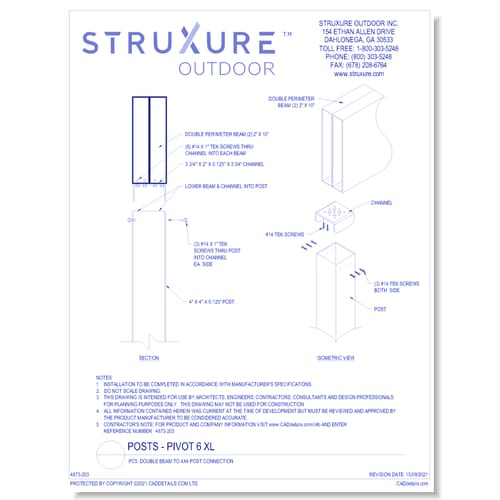 PC5: Double Beam To 4 x 4 Post Connection
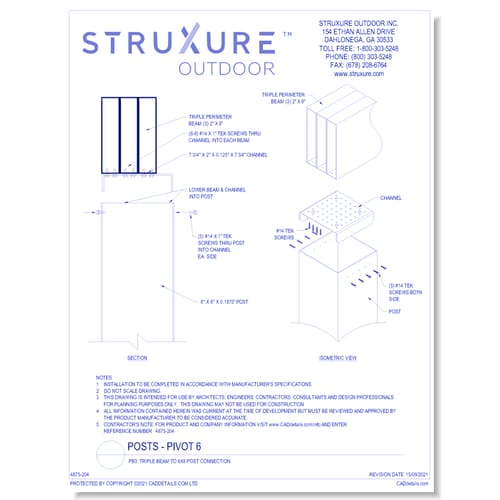 PB3: Triple Beam To 8 x 8 Post Connection
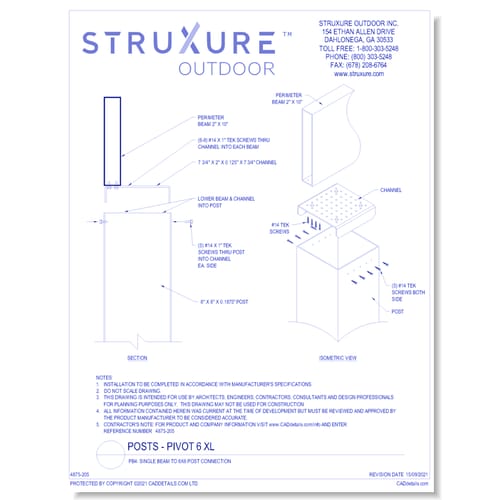 PB4: Single Beam To 8 x 8 Post Connection
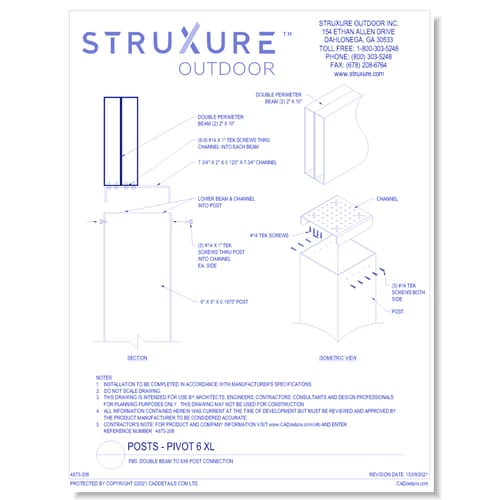 PB5: Double Beam To 8 x 8 Post Connection
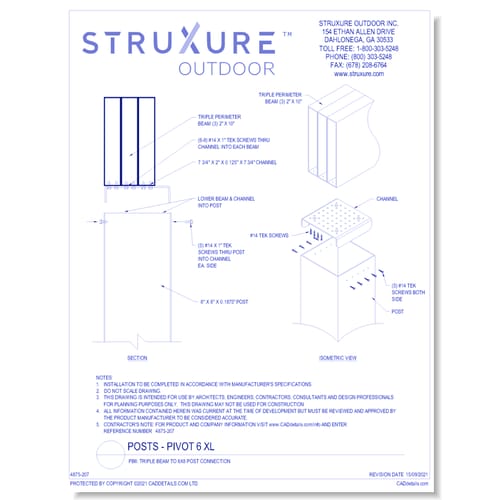 PB6: Triple Beam To 8 x 8 Post Connection
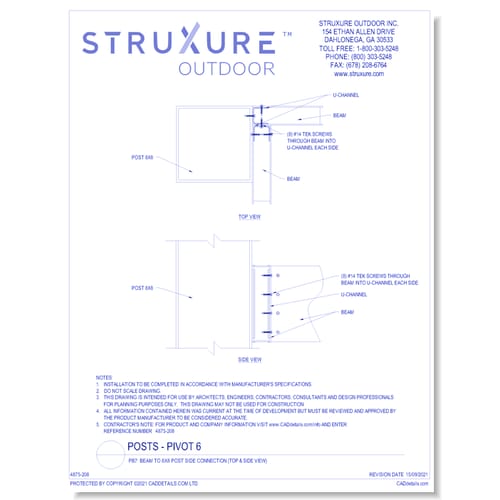 PB7: Beam To 8 x 8 Post Side Connection (Top & Side View)
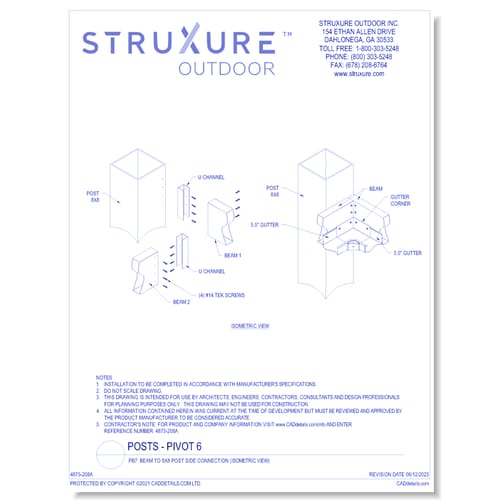 PB7: Beam To 8 x 8 Post Side Connection (Isometric View)
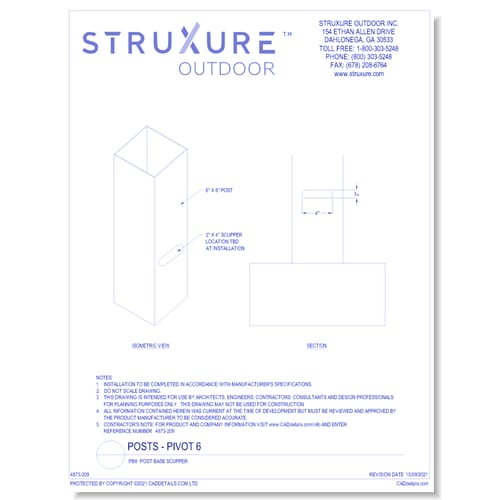 PB8: Post Base Scupper
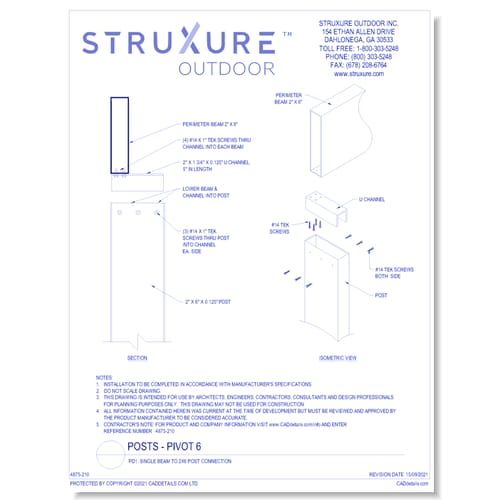 PD1: Single Beam To 2 x 6 Post Connection
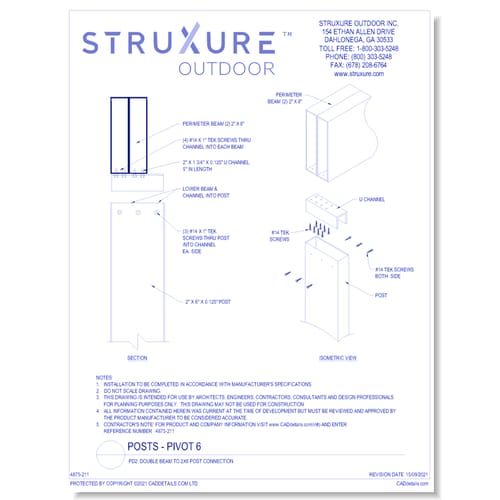 PD2: Double Beam To 2 x 6 Post Connection
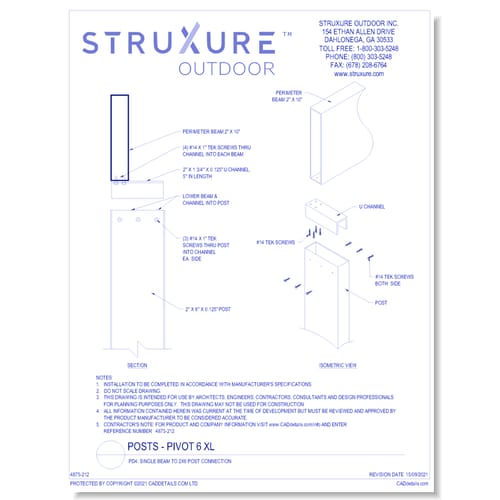 PD4: Single Beam To 2 x 6 Post Connection
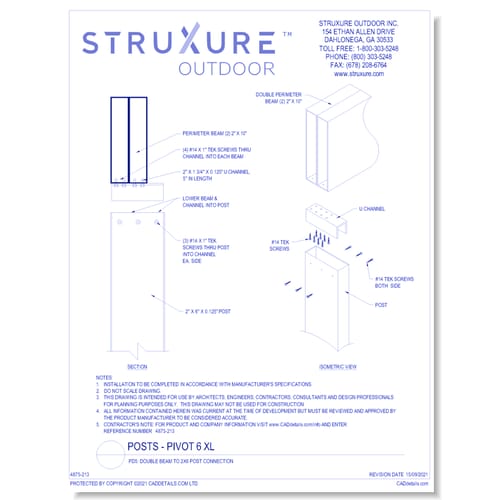 PD5: Double Beam To 2 x 6 Post Connection
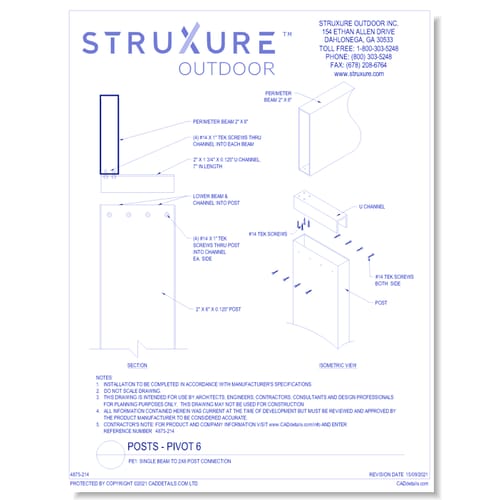 PE1: Single Beam To 2 x 8 Post Connection
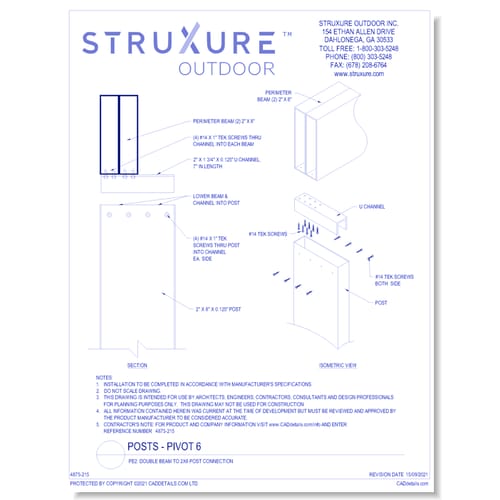 PE2: Double Beam To 2 x 8 Post Connection
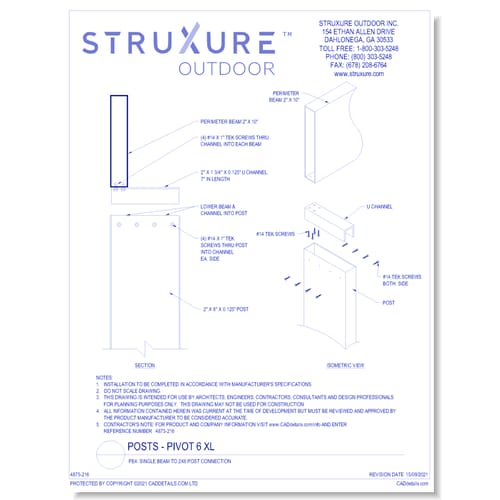 PE4: Single Beam To 2 x 8 Post Connection
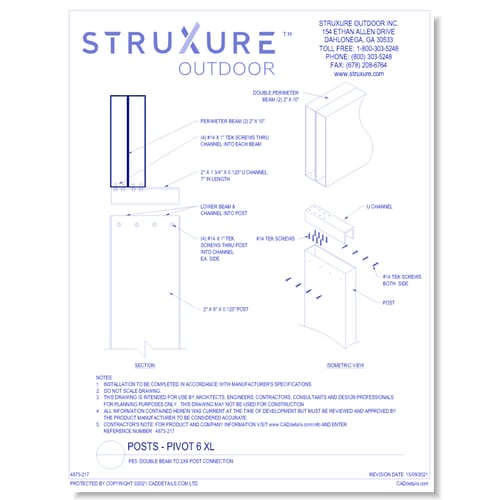 PE5: Double Beam To 2 x 8 Post Connection
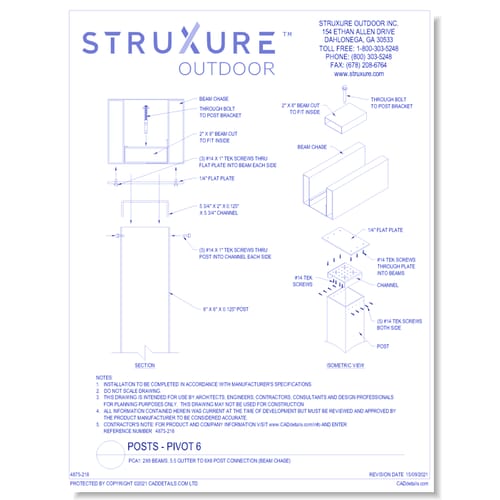 PCA1: 2 x 8 Beams, 5.5 Gutter To 6 x 6 Post Connection (Beam Chase)
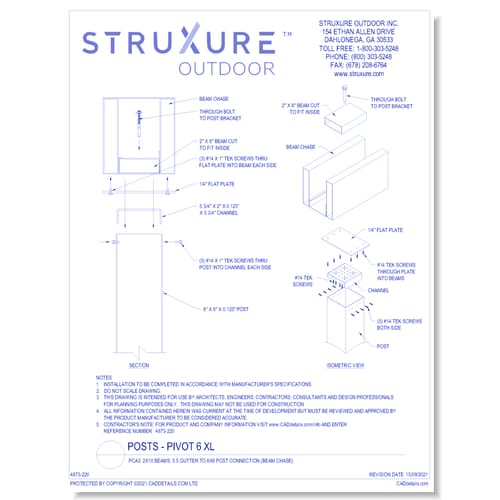 PCA3: 2 x 10 Beams, 5.5 Gutter To 6x6 Post Connection (Beam Chase)
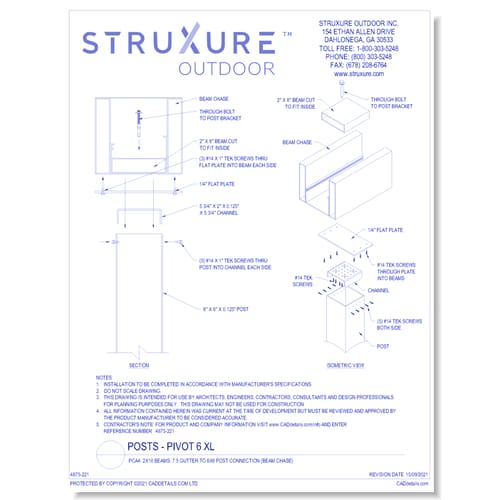 PCA4: 2 x 10 Beams, 7.5 Gutter To 6x6 Post Connection (Beam Chase)
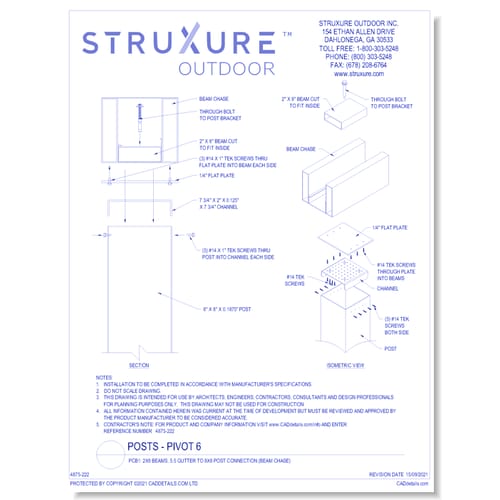 PCB1: 2 x 8 Beams, 5.5 Gutter To 8x8 Post Connection (Beam Chase)
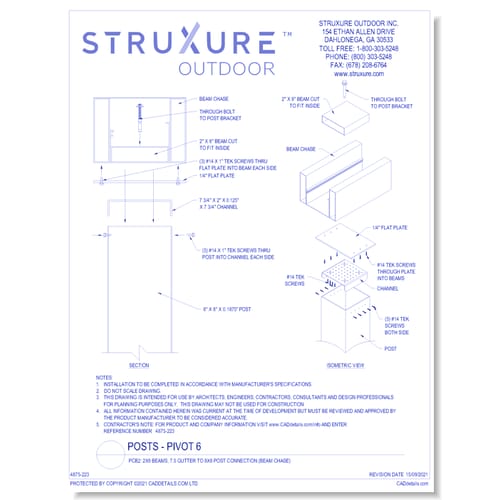 PCB2: 2 x 8 Beams, 7.5 Gutter To 8x8 Post Connection (Beam Chase)
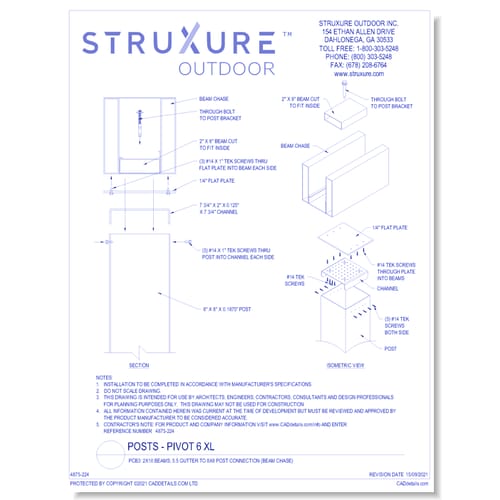 PCB3: 2 x 10 Beams, 5.5 Gutter To 8x8 Post Connection (Beam Chase)
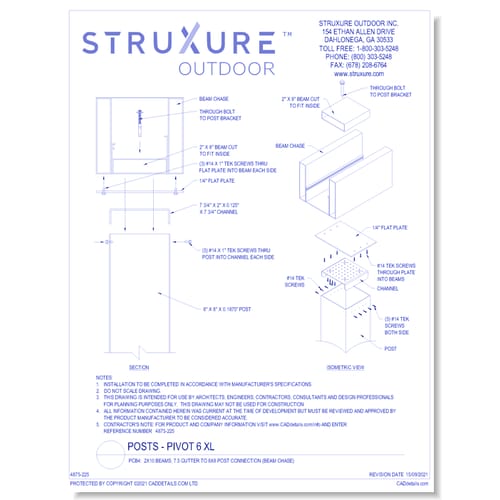 PCB4: 2 x 10 Beams, 7.5 Gutter To 8x8 Post Connection (Beam Chase)
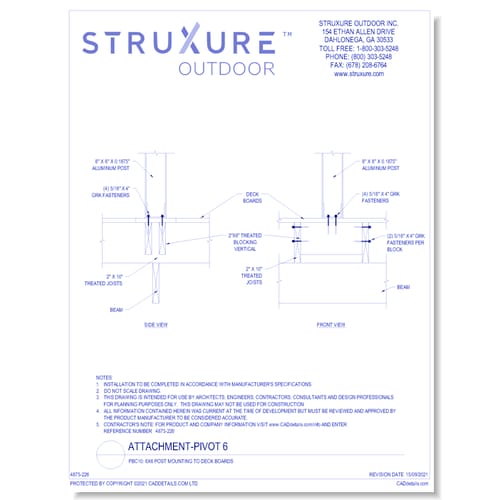 PBC10: 6 x 6 Post Mounting To Deck Boards
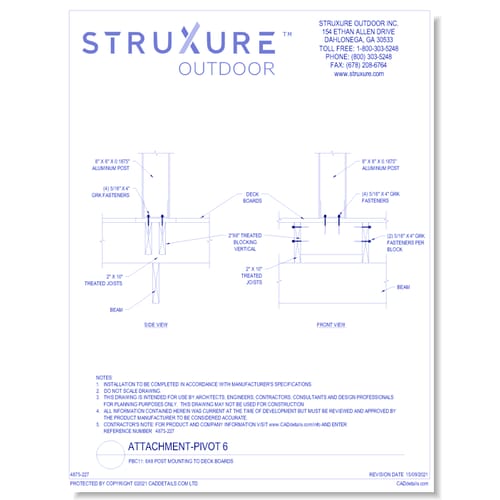 PBC11: 8 x 8 Post Mounting To Deck Boards
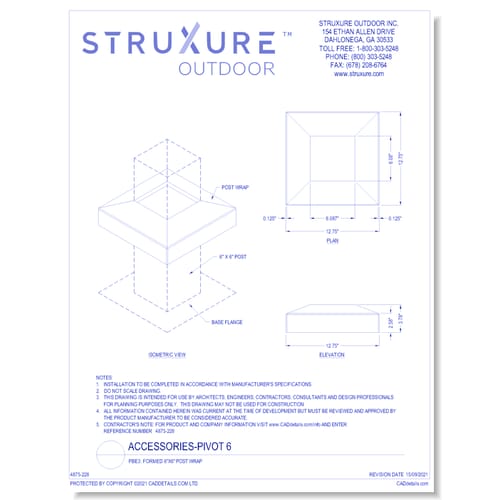 PBE3: Formed 6" X 6" Post Wrap
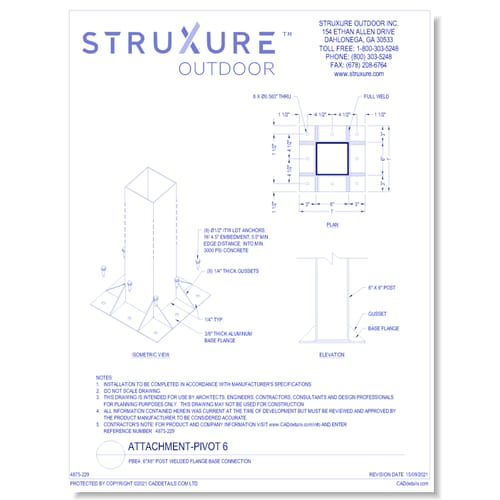 PBE4: 6" X 6" Post Welded Flange Base Connection
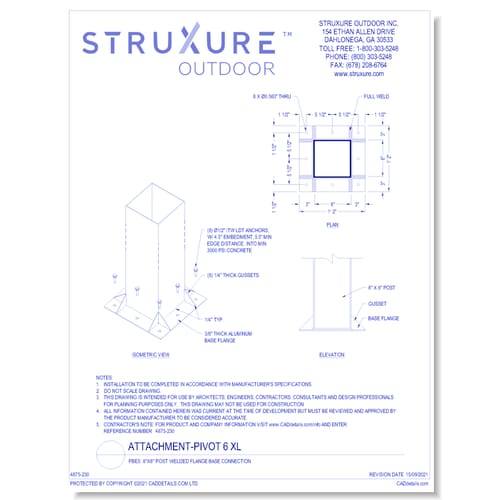 PBE5: 8" X 8" Post Welded Flange Base Connection
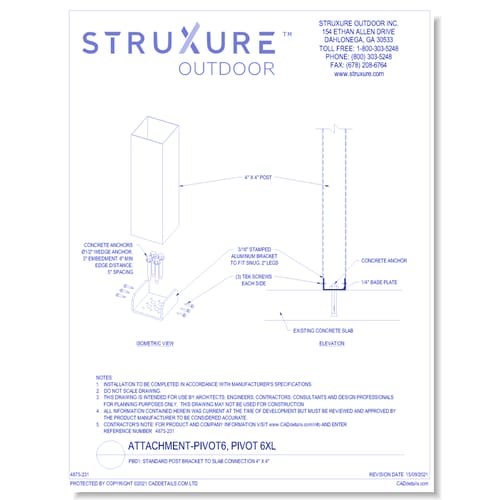 PBD1: Standard Post Bracket To Slab Connection 4" X 4"
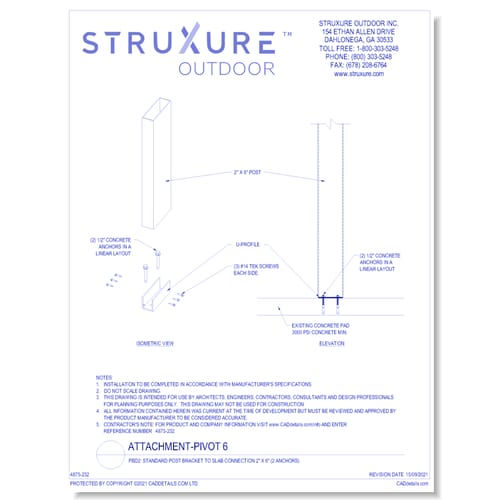 PBD2: Standard Post Bracket To Slab Connection 2" X 6" (2 Anchors)
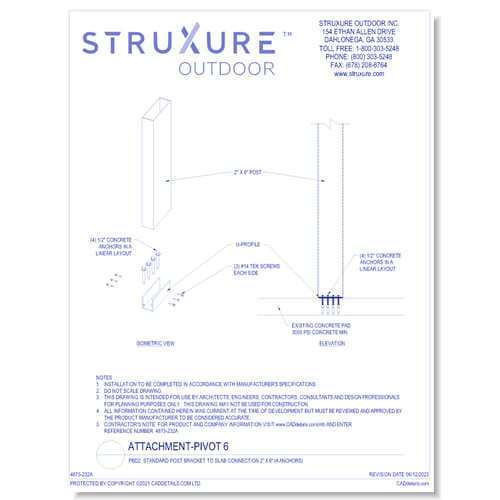 PBD2: Standard Post Bracket To Slab Connection 2" X 6" (4 Anchors)
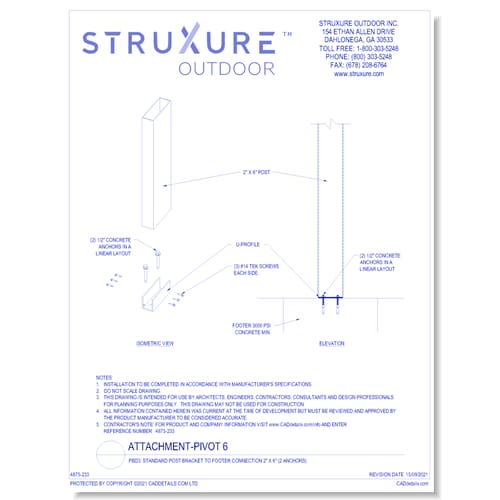 PBD3: Standard Post Bracket To Footer Connection 2" X 6" (2 Anchors)
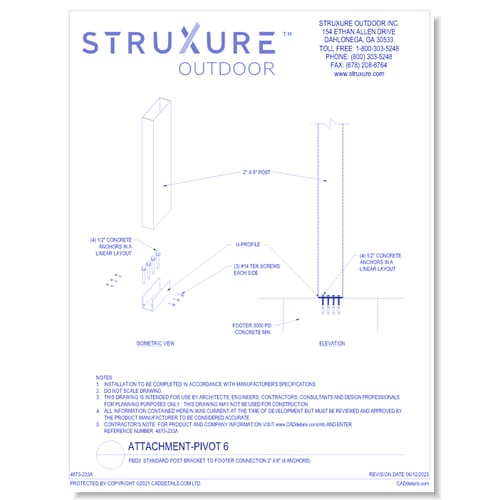 PBD3: Standard Post Bracket To Footer Connection 2" X 6" (4 Anchors)
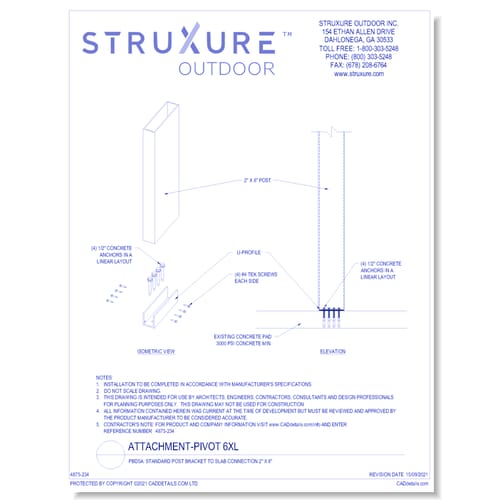 PBD5A: Standard Post Bracket To Slab Connection 2" X 8"
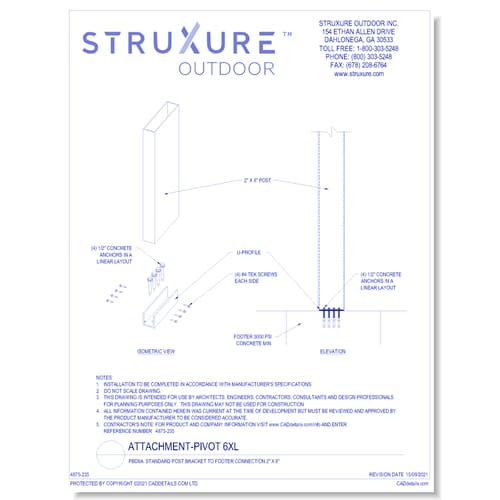 PBD6A: Standard Post Bracket To Footer Connection 2" X 8"
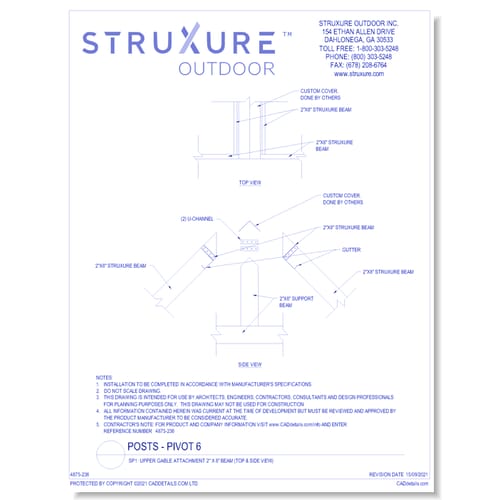 SP1: Upper Gable Attachment 2" X 8" Beam (Top & Side View)
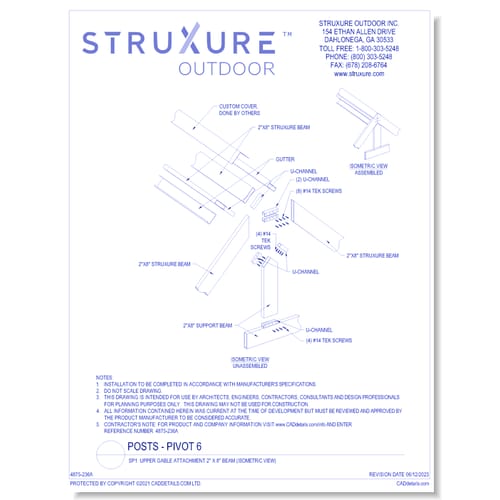 SP1: Upper Gable Attachment 2" X 8" Beam (Isometric View)
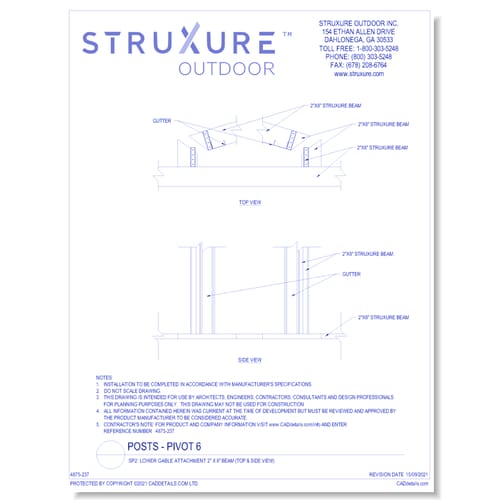 SP2: Lower Gable Attachment 2" X 8" Beam (Top & Side View)
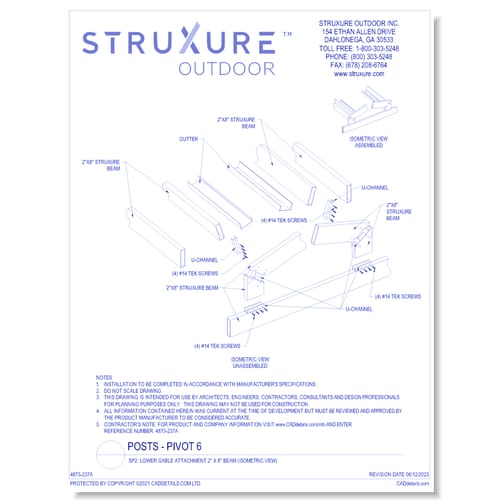 SP2: Lower Gable Attachment 2" X 8" Beam (Isometric View)
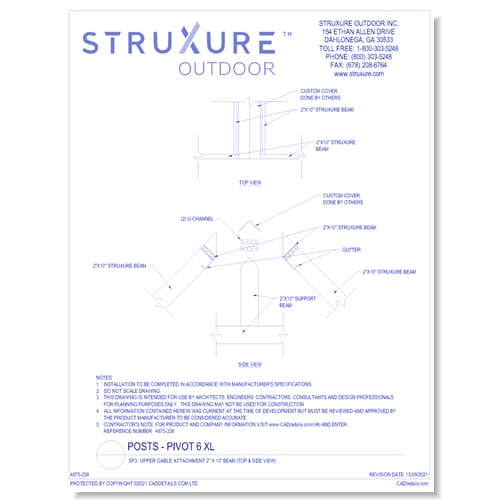 SP3: Upper Gable Attachment 2" X 10" Beam (Top & Side View)
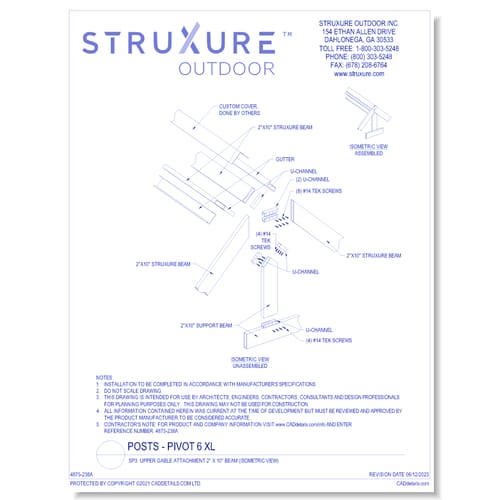 SP3: Upper Gable Attachment 2" X 10" Beam (Isometric View)
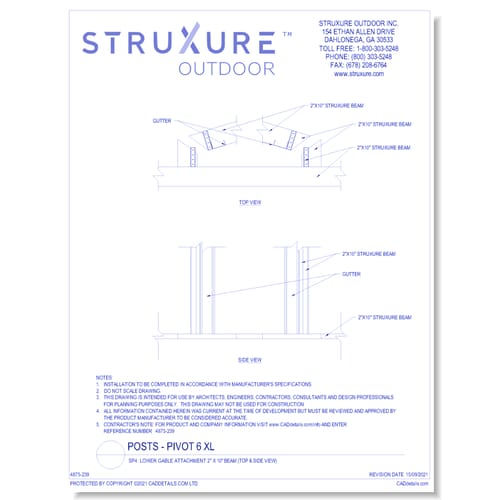 SP4: Lower Gable Attachment 2" X 10" Beam (Top & Side View)
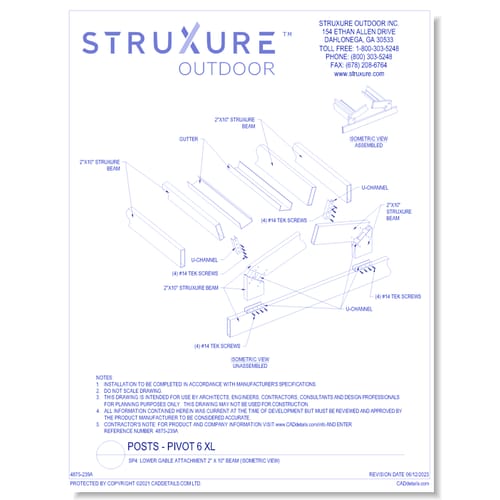 SP4: Lower Gable Attachment 2" X 10" Beam (Isometric View)
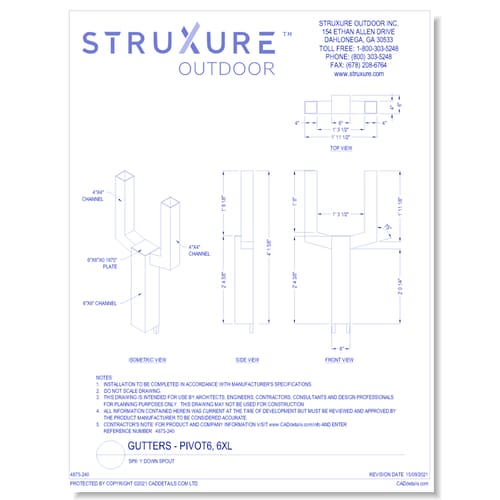 SP6: Y Down Spout
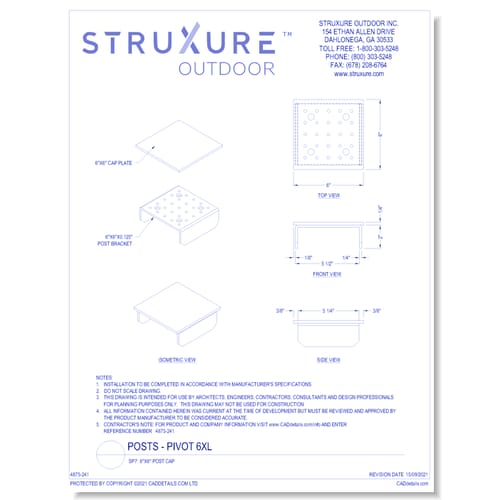 SP7: 6" X 6" Post Cap
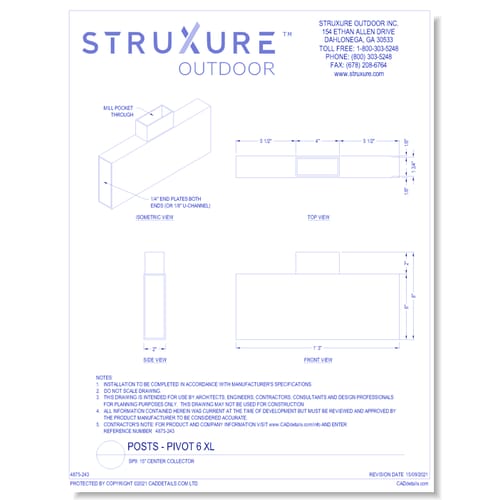 SP9: 15" Center Collector
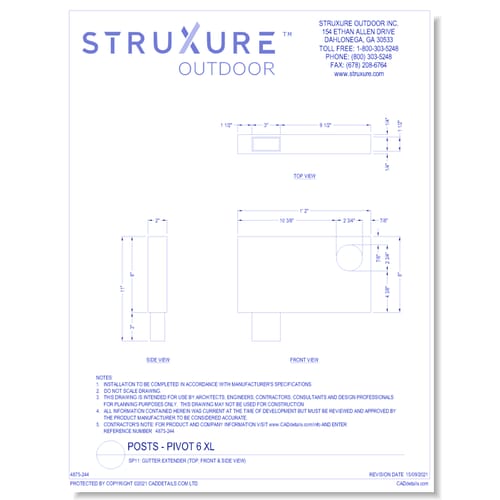 SP11: Gutter Extender (Top, Front & Side View)
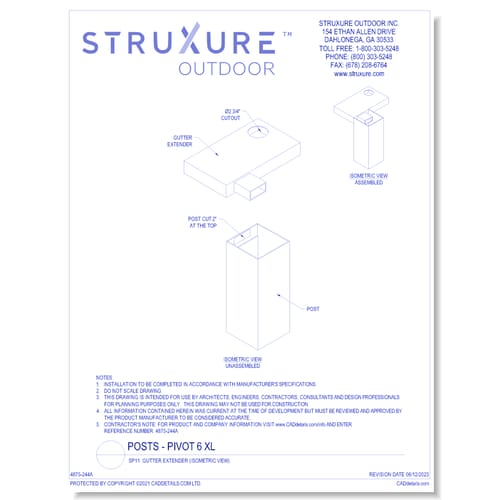 SP11: Gutter Extender (Isometric View)
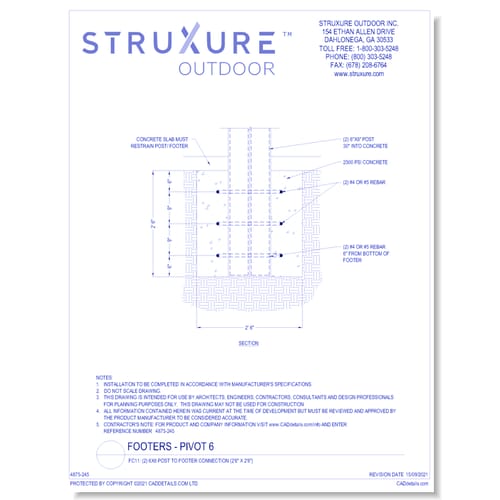 FC11: 6 x 6 Post To Footer Connection (2' 6" X 2' 6")
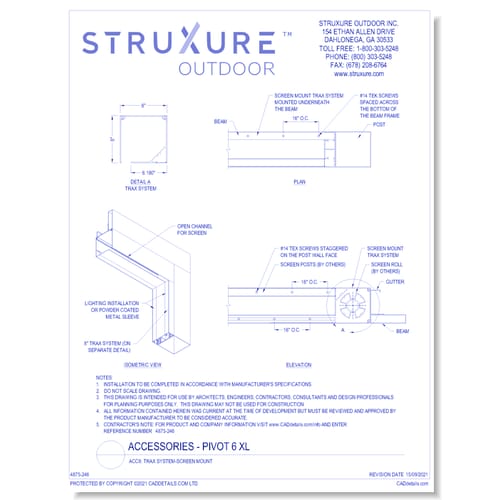 ACC8: Trax System-Screen Mount